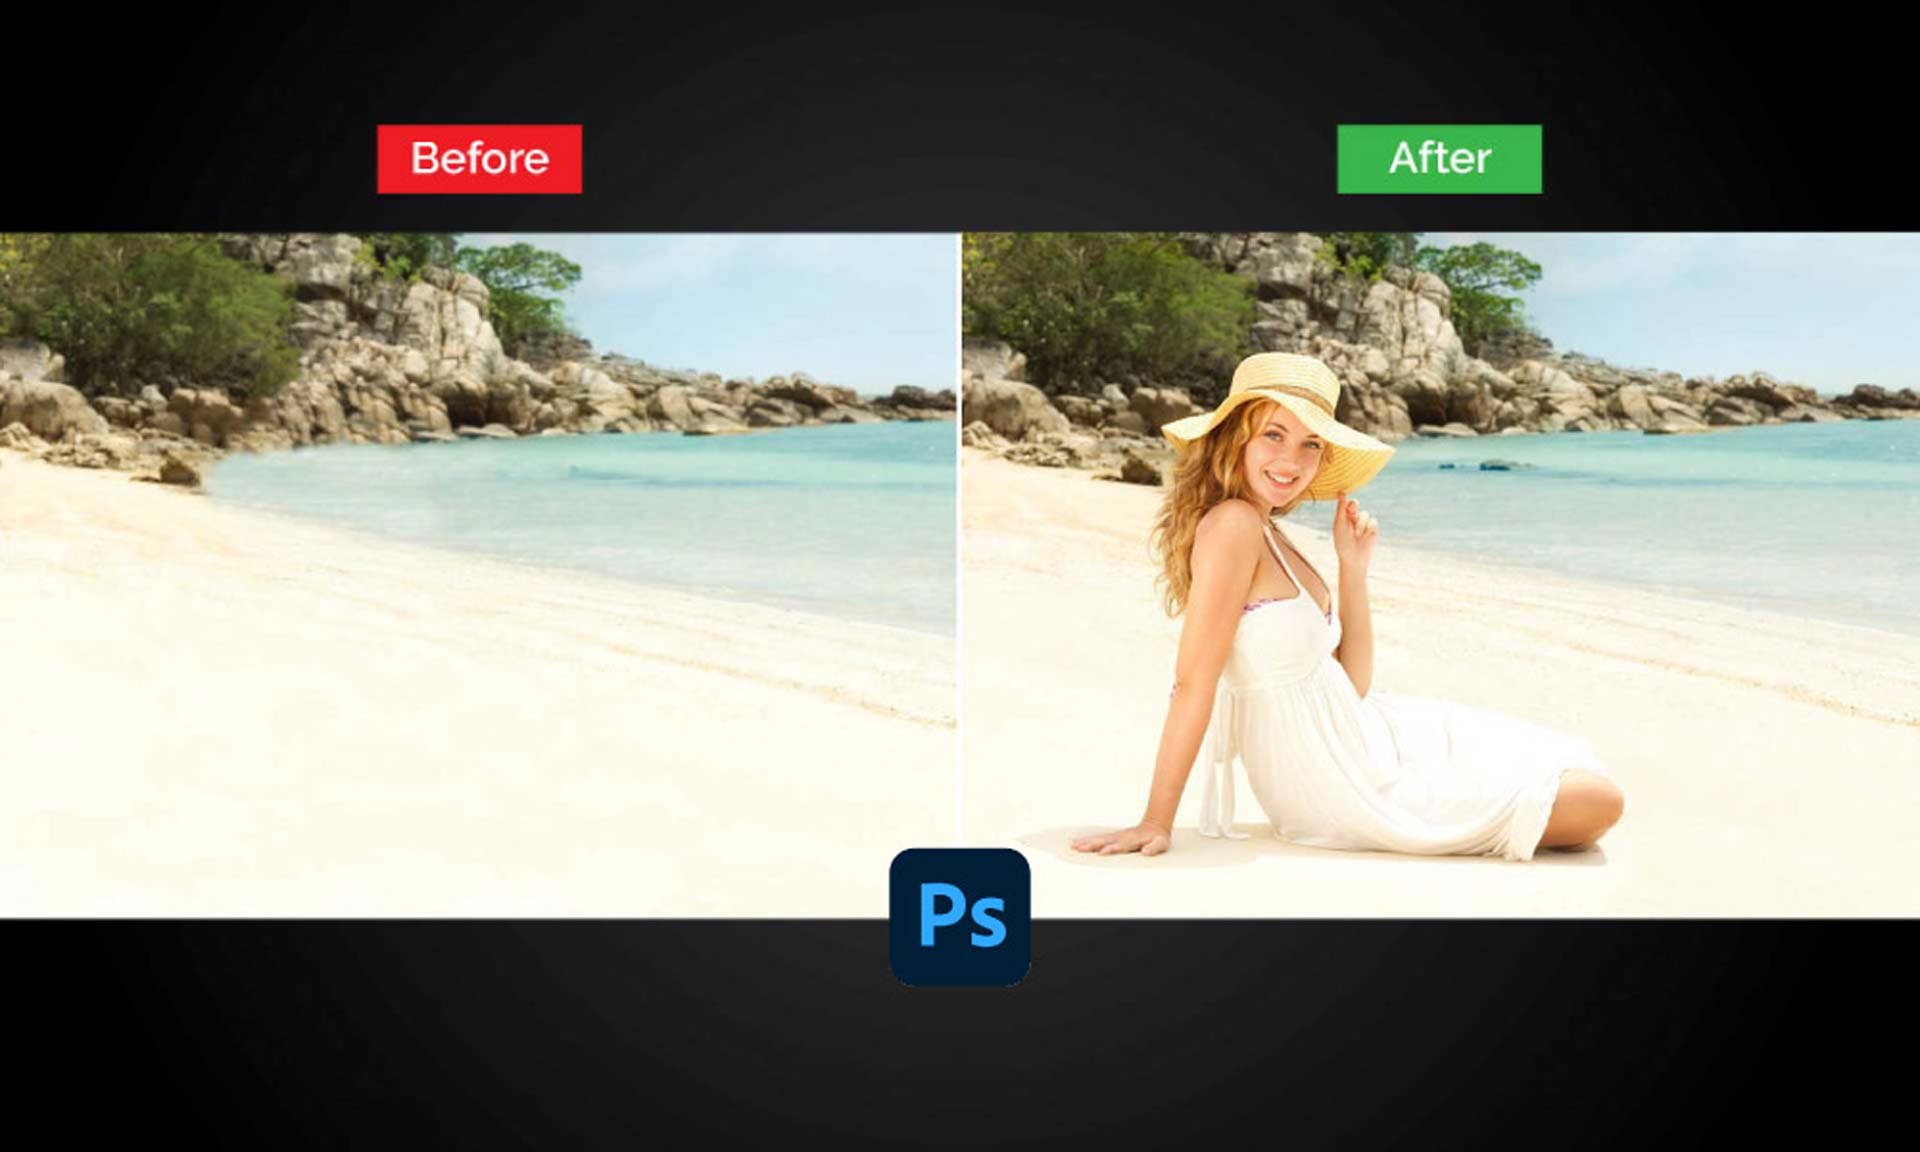
In Adobe Photoshop, you may add a person or an object to a photo and create realistic composites. Well! Let’s say you have a photo of yourself and a picture of a gorgeous beach, and you want to put yourself on the beach, or you have an image of a client who wants you to put him next to a superstar. Therefore, you can effortlessly accomplish these tasks with Adobe Photoshop by reading this tutorial; how to photoshop a picture. It’s a simple compositing technique that gives up limitless creative possibilities for merging and synchronizing people, places, and times without raising too much suspicion.
In this article, I’ll show you how to photoshop someone into a picture in the most basic and realistic manner possible.
So, let’s get started!
How To Photoshop A Picture? [Proven 10 Steps]
To modify any photograph, Photoshop is a wonderland. Doing photoshop someone into a picture is a straightforward operation, but there are some criteria to follow to succeed.
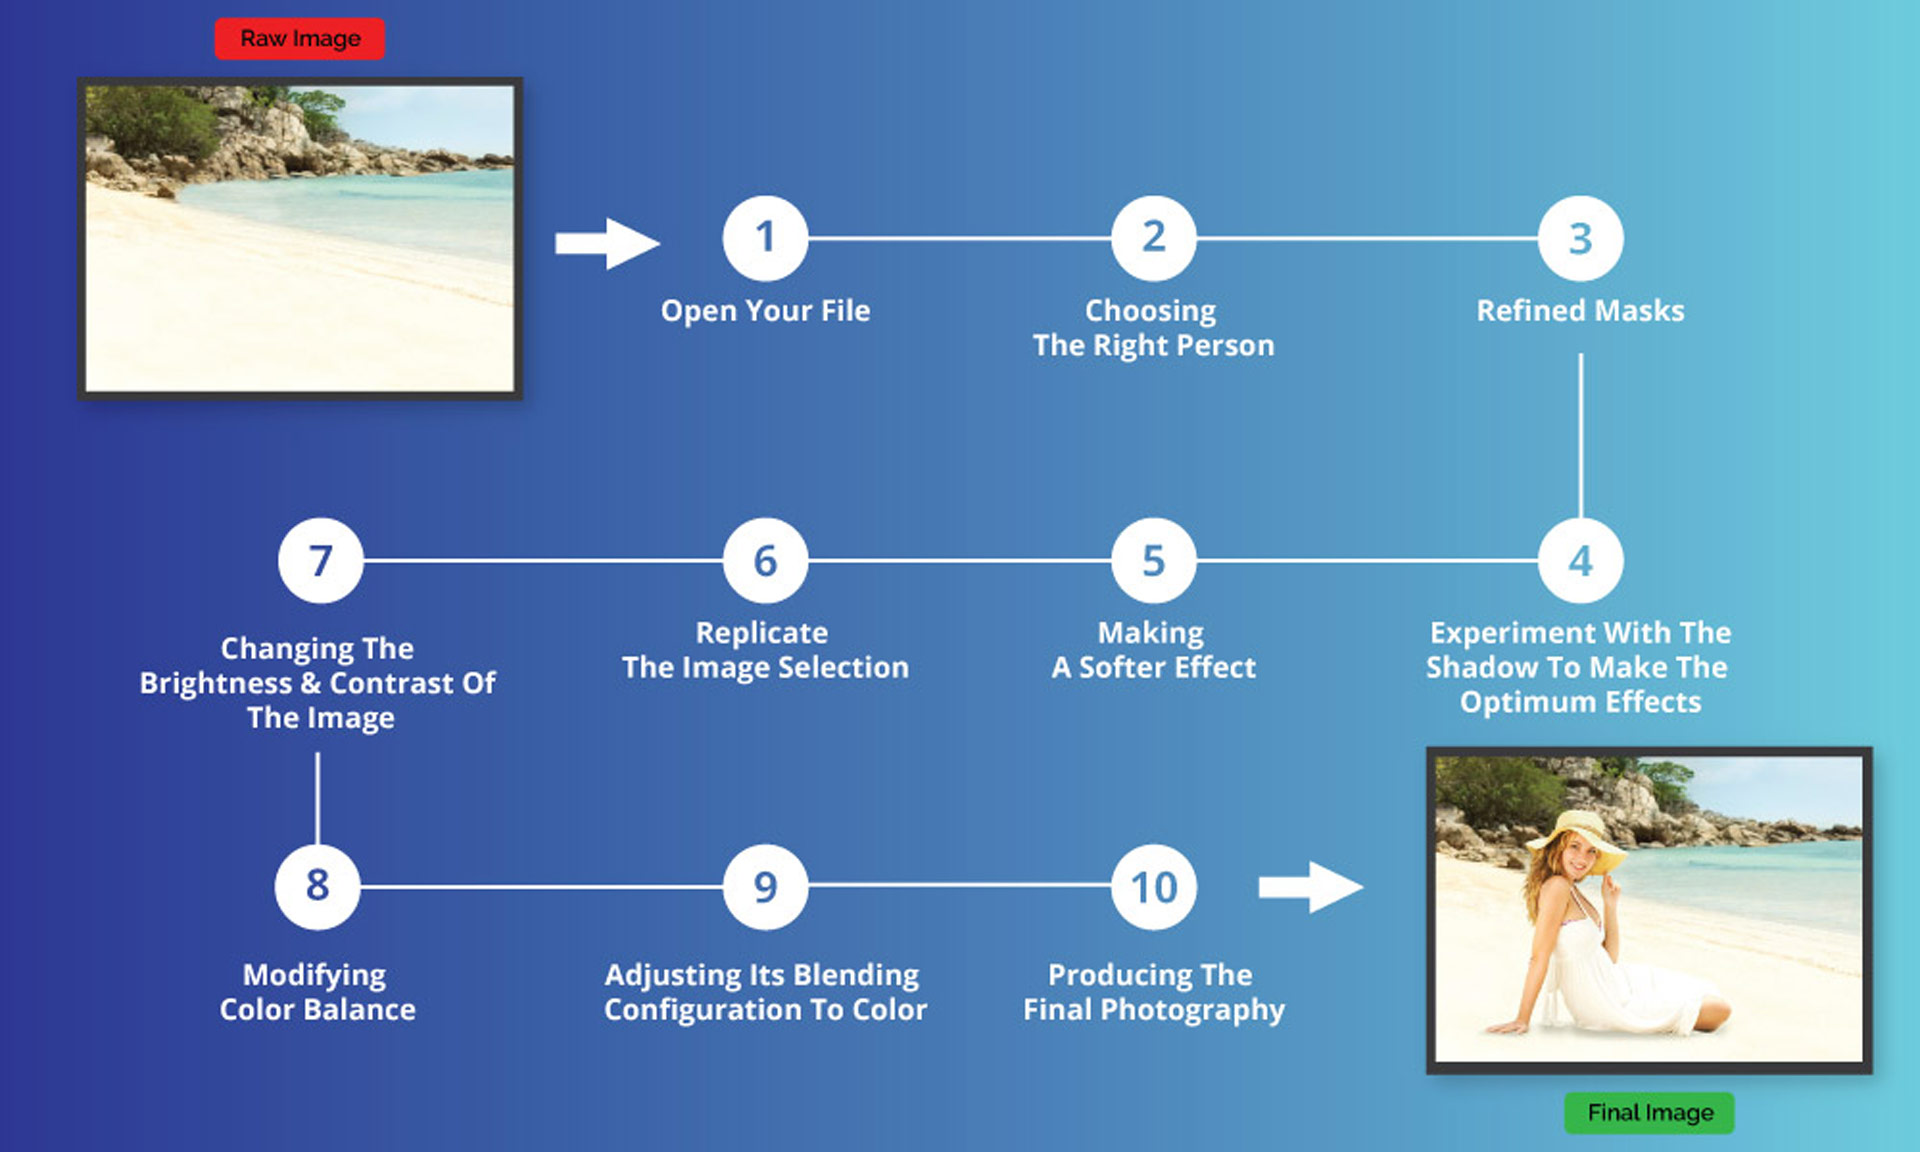
There is a step-by-step guide regarding how to photoshop people into pictures including- adding friends, family members, celebrities, or anyone else to a photo, that they weren’t in. Let’s look at the key 10 phases involved in the procedure.
Start reading!!
Step#1 Open Your File:
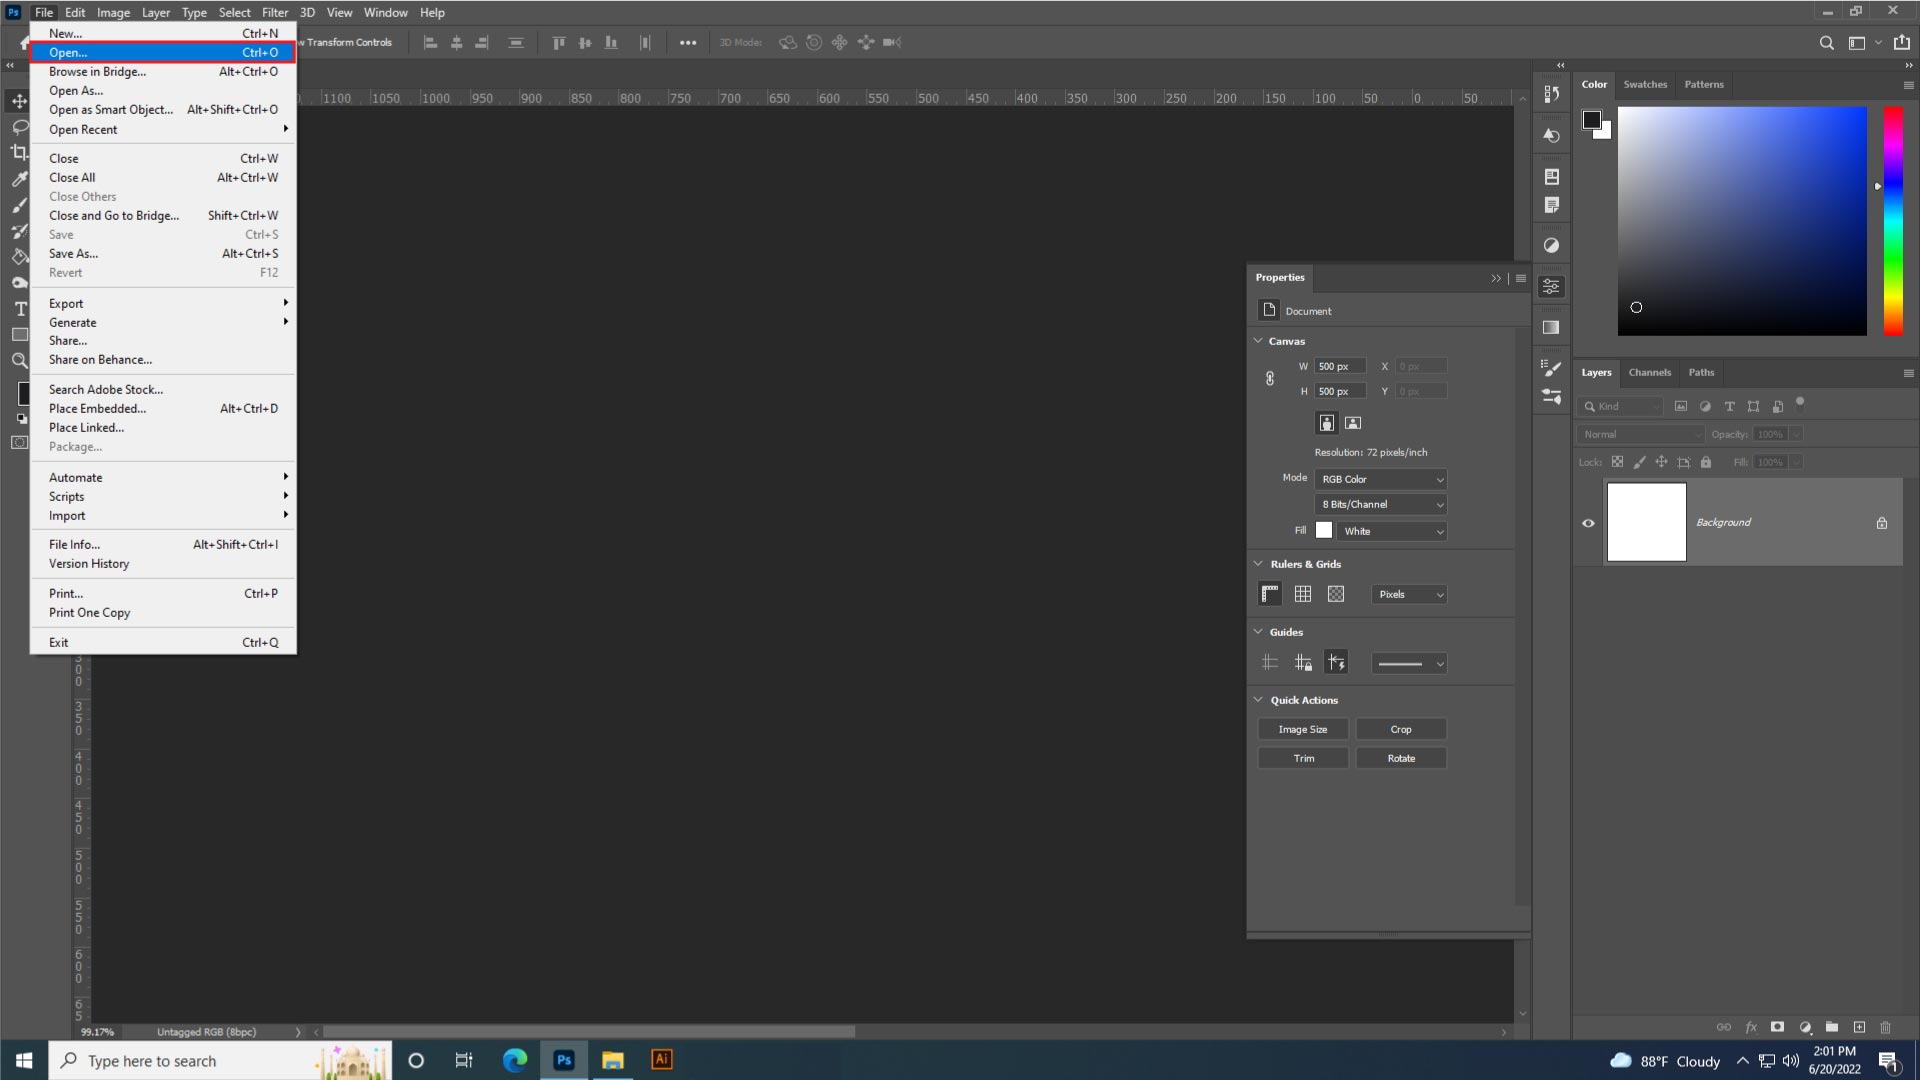
The first step is to open both photos in Photoshop, the one containing your subject and the one holding the scenario in which you want the subject to appear. You can easily do this by dragging & dropping the picture onto the Adobe Photoshop interface.
Alternatively, you can access File > Open from the top left corner.
Step#2. Choosing The Right Person:
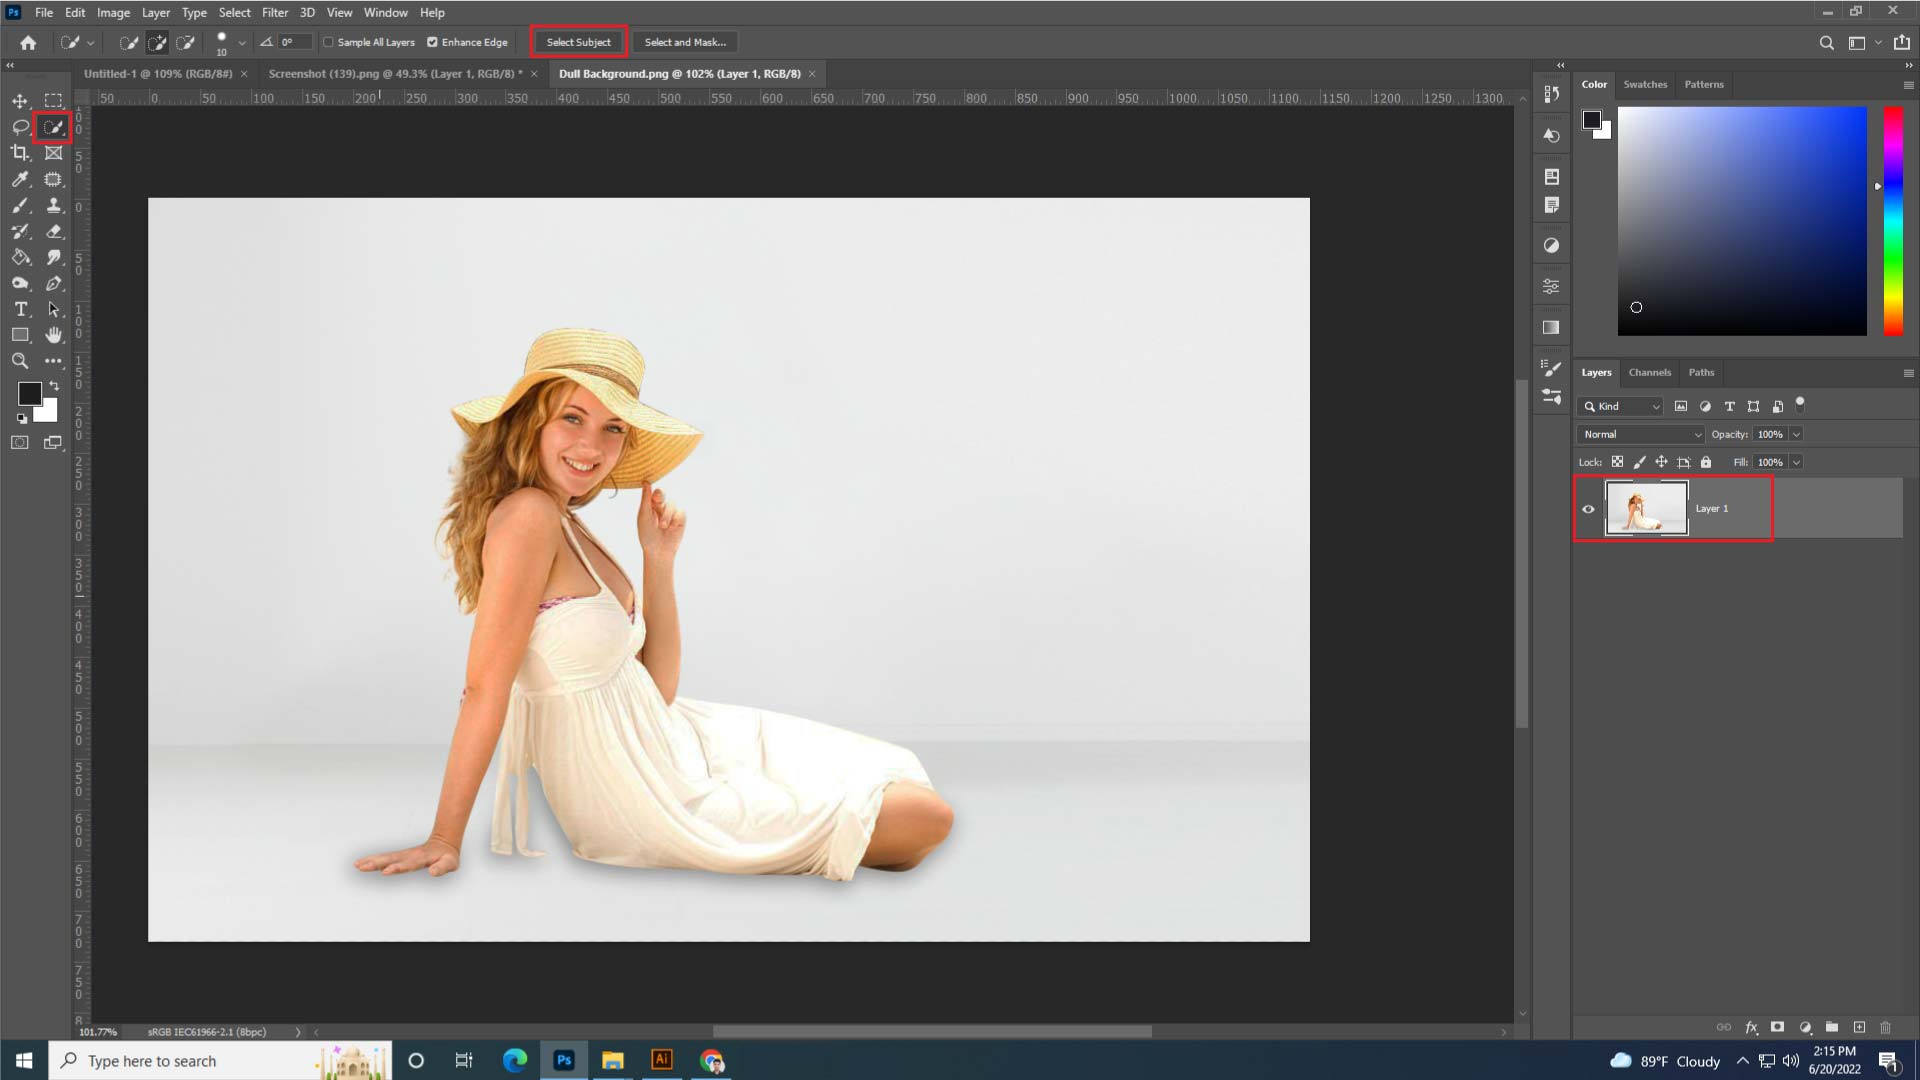
Now, you need to select the image’s object or person. Use any ‘selection tool’ for this, but you’ve to be more specific.
In Adobe Photoshop, you will have various tools for deciding, such as the marquee and lasso tools, but my all-time favorite is the Pen Tool. You can use the ‘Quick Selection’ option to select quickly the person you wish to extract in newer versions of this app.
In the latest version of Adobe Photoshop, you can choose the subject of a photo by pressing the ‘Select Subject.’
Figures with a clean basis are easier to remove. Here, we recommend using the Pen Tool to build a more precise path around the figure, which you can then convert into a selection — right-click after drawing away and then pick ‘Make Selection.’
- Receive professional headshot retouching service for about $0.50 per photo.
Step#3. Refined Masks:
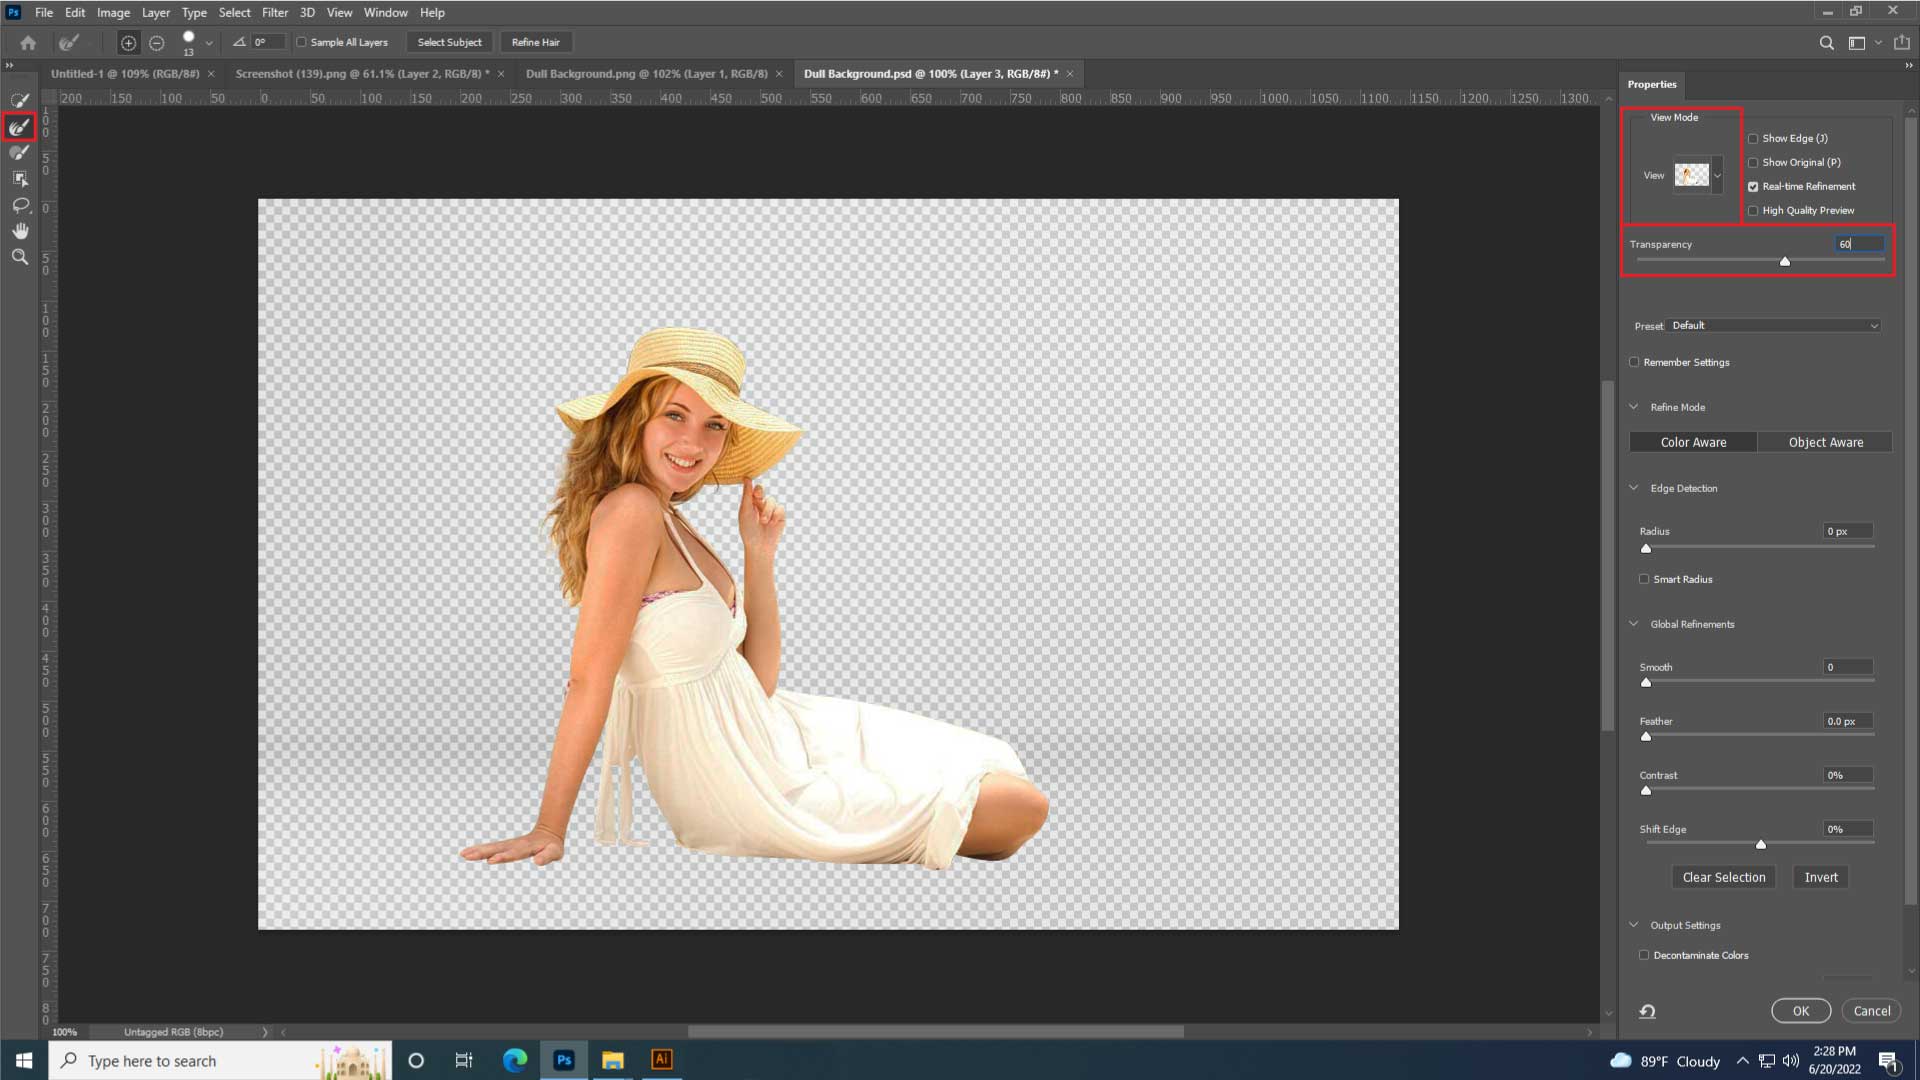
If your image has fine hair, don’t worry about being too precise in your selection. This can be improved by using the ‘Select & Mask’ option. You can find the ‘Select and Mask’ at the top of the workspace by clicking ‘Select and Mask.’
It’s better to use a brush with the ”Refine Edge Brush” tool to paint over the hair’s edge appropriately. In the View Mode, select the ‘Onion Skin’ option & then set the transparency value ranging from 60 to 70%.
Using the Quick Selection or Brush Tool, you can enhance what should already be seen using the ‘Select and Mask’ tool while using the ‘Refine Edge Brush’ tool to remove any excess foundation. There’s no more rush with this tool. So, take as much time span as you may require.
- Check out how to make blurry pictures clear
When you’re ready, click OK to proceed.
Step#4. Replicate The Image Selection:
This time, you’ll need to copy the selection you made around your subject and paste it into the following image you’re working on it. When you’re done with the first image, go to Edit > Copy and then Edit > Paste. Try to do this by pressing ‘Ctrl + C,’ and then ‘Ctrl + V’ on the next photo.
We’ll resize and tinker with the figure that we’ve removed to find the perfect fit. You can experiment with scale to create a sense of profundity if you like. That first picture shows a more natural-looking result because of the fine hair strands that were extracted with additional refinement.
Reconfigure your selected image to fit in with the people in a new photograph in any way you feel fit.
Step#5. Making A Softer Effect:
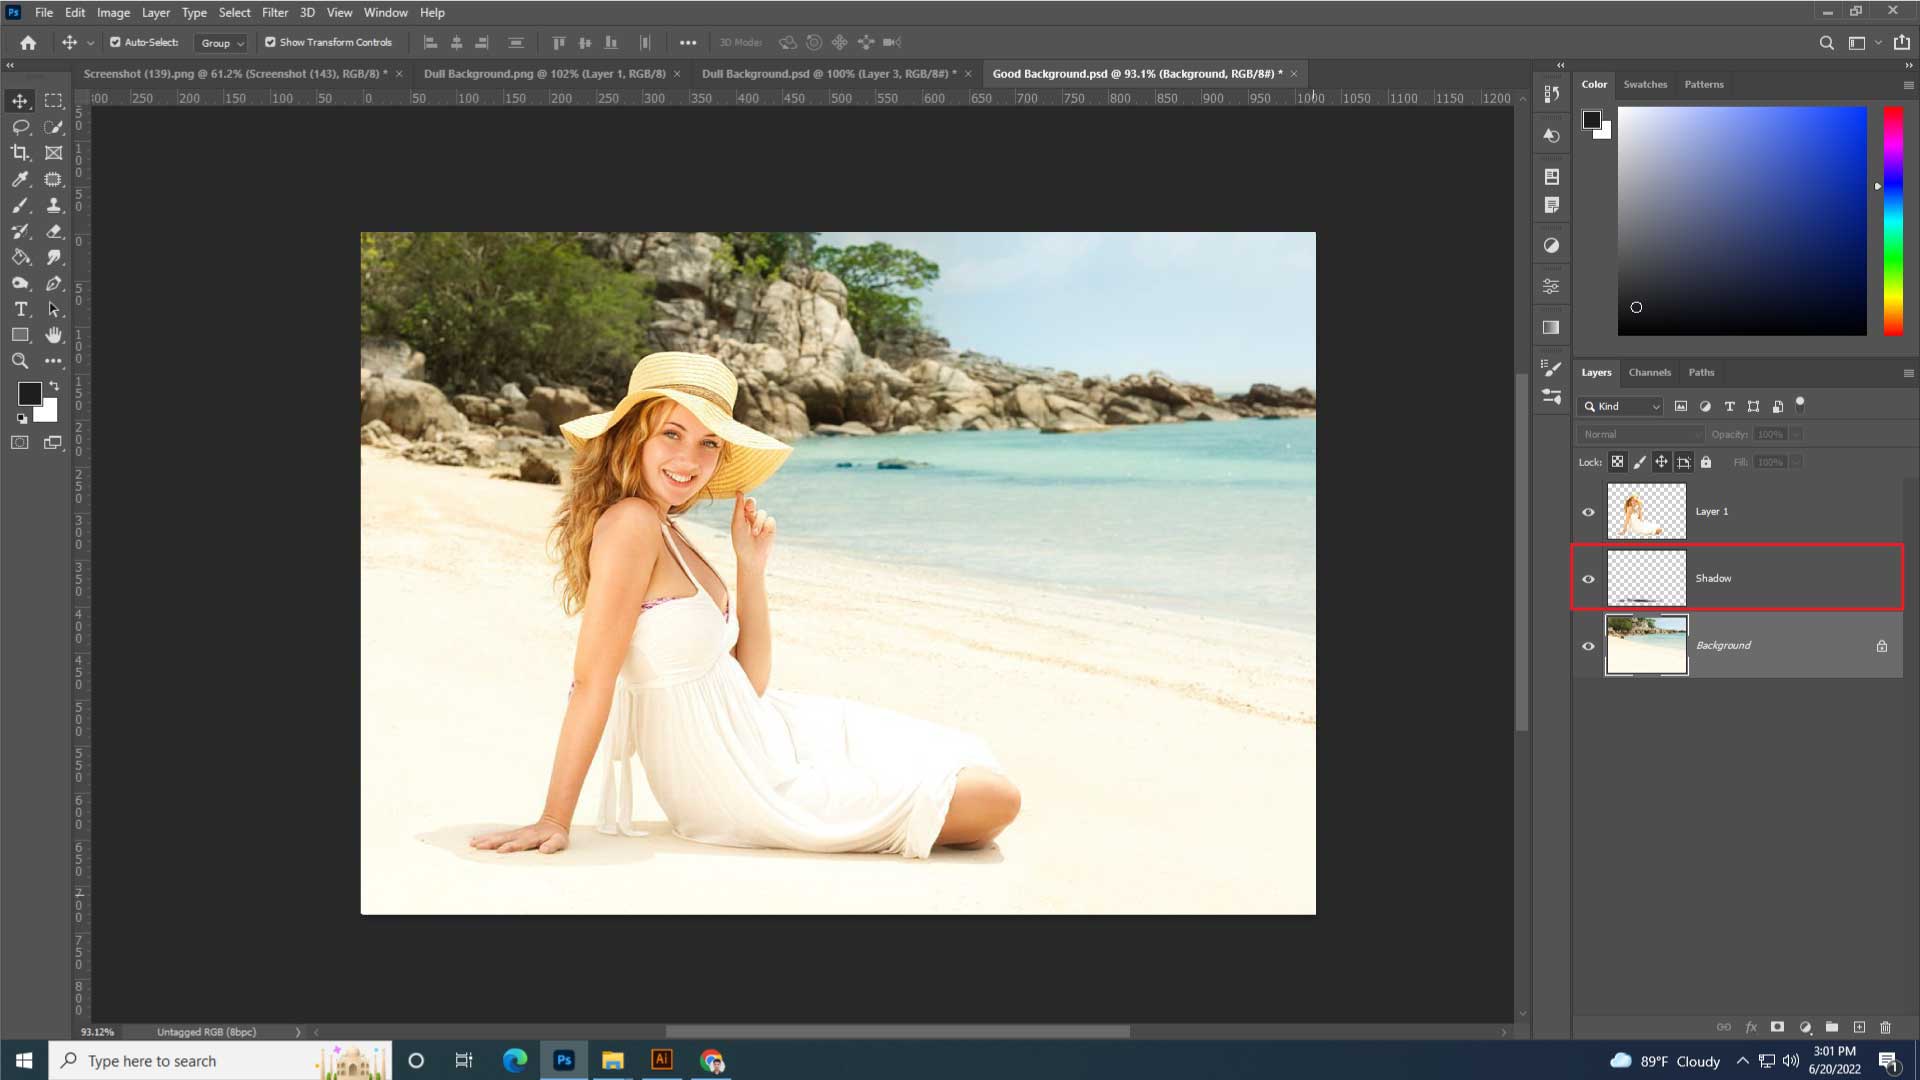
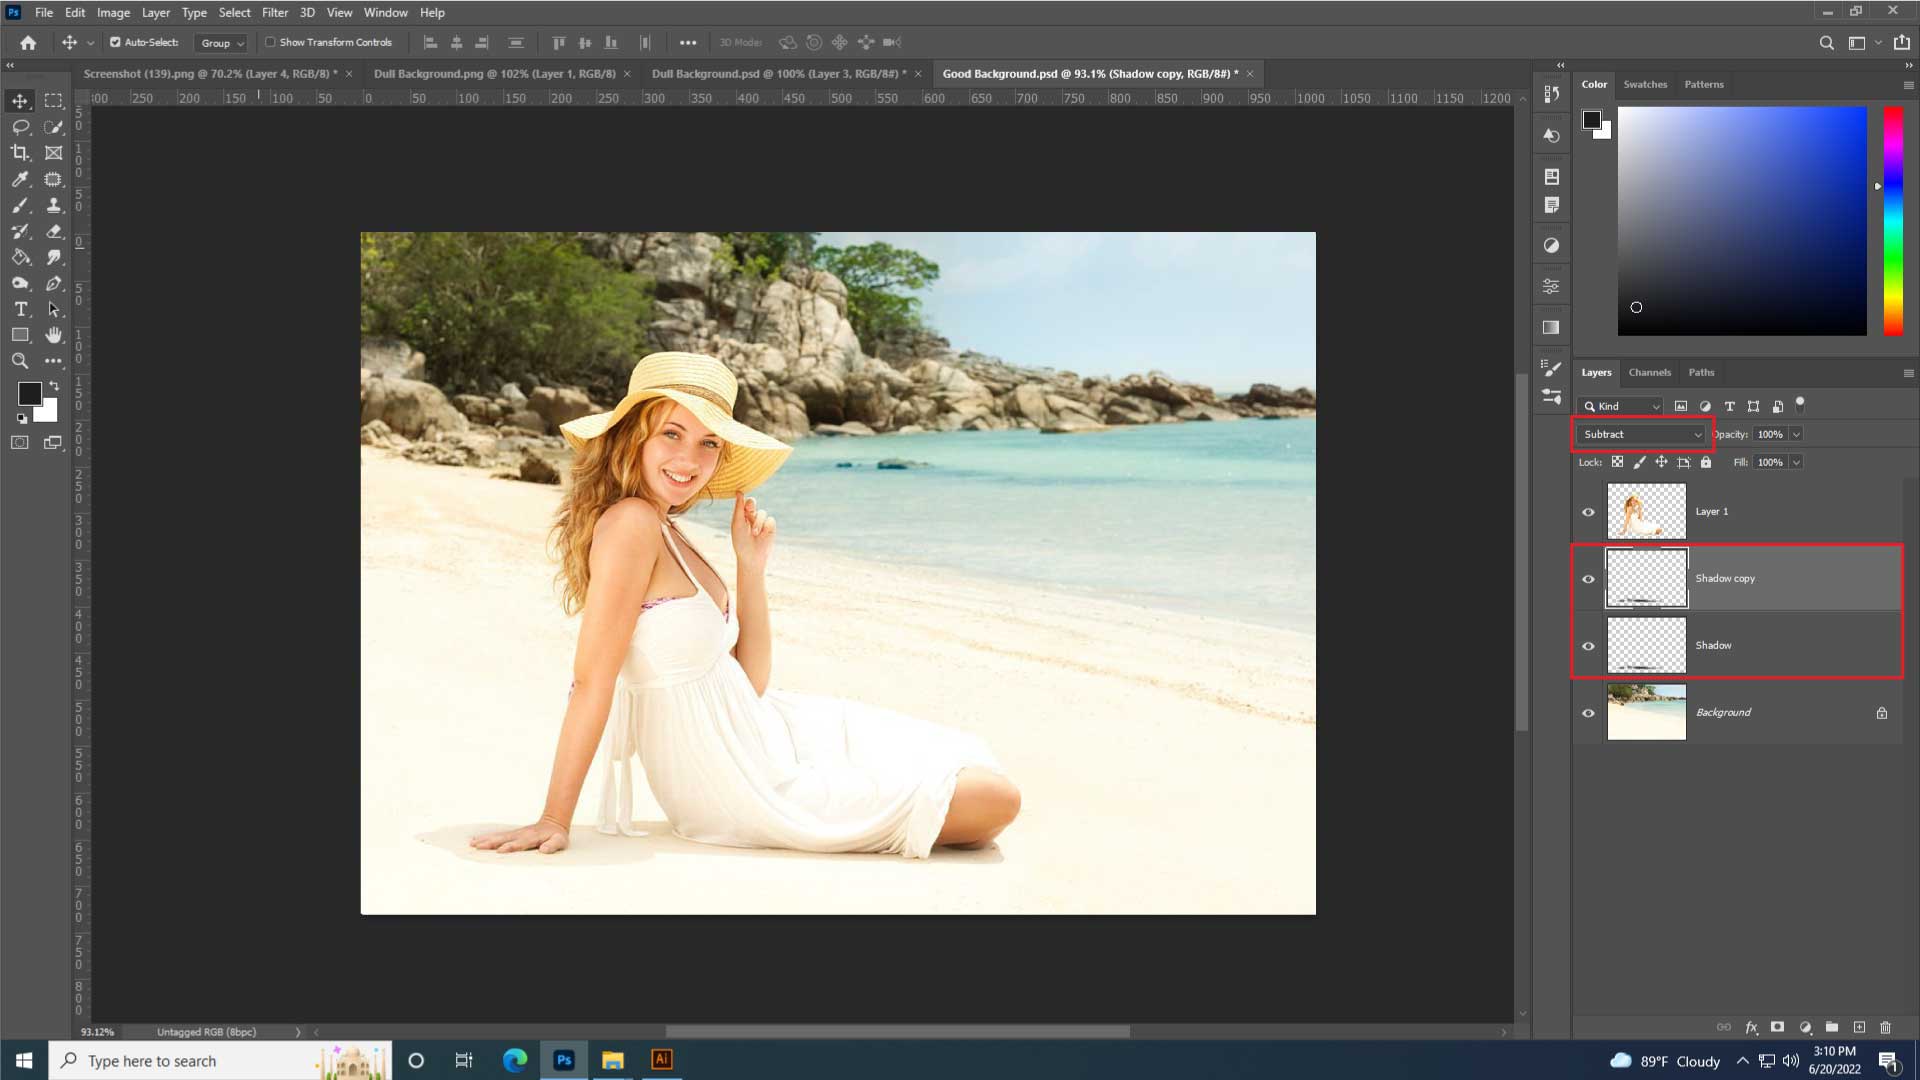
In this stage, apply shadows to the feet of the extracted figure to make it appear more realistic. Then you have to generate a new layer & name it ‘Shadow’ for the shadows. Use the Brush tool (B) and a dark brown or black to paint in the shadows where they should naturally emerge. The brush hardness must be zero to provide a softer effect.
Step#6: Experiment With The Shadow To Make The Optimum Effects:
Make sure that the ‘Blending Mode’ of the Shadow layer is set to ‘Subtract.’ If the shadow is not too intense and you want to make it darker, try to make a clone of the ‘Shade Layer’ and paste it over the original. It will make the shadow darker.
You can achieve a more regular appearance by lowering the opacity of the duplicate of the ‘Shadow Layer.’ Experiment with the shadow in various ways until you get the desired effect.
- Read more about how to cut out an image in photoshop
Step#7: Changing The Brightness & Contrast Of The Image:
The next step is to make any necessary adjustments to the brightness or contrast of the inserted figure so that it blends in seamlessly with the backdrop picture.
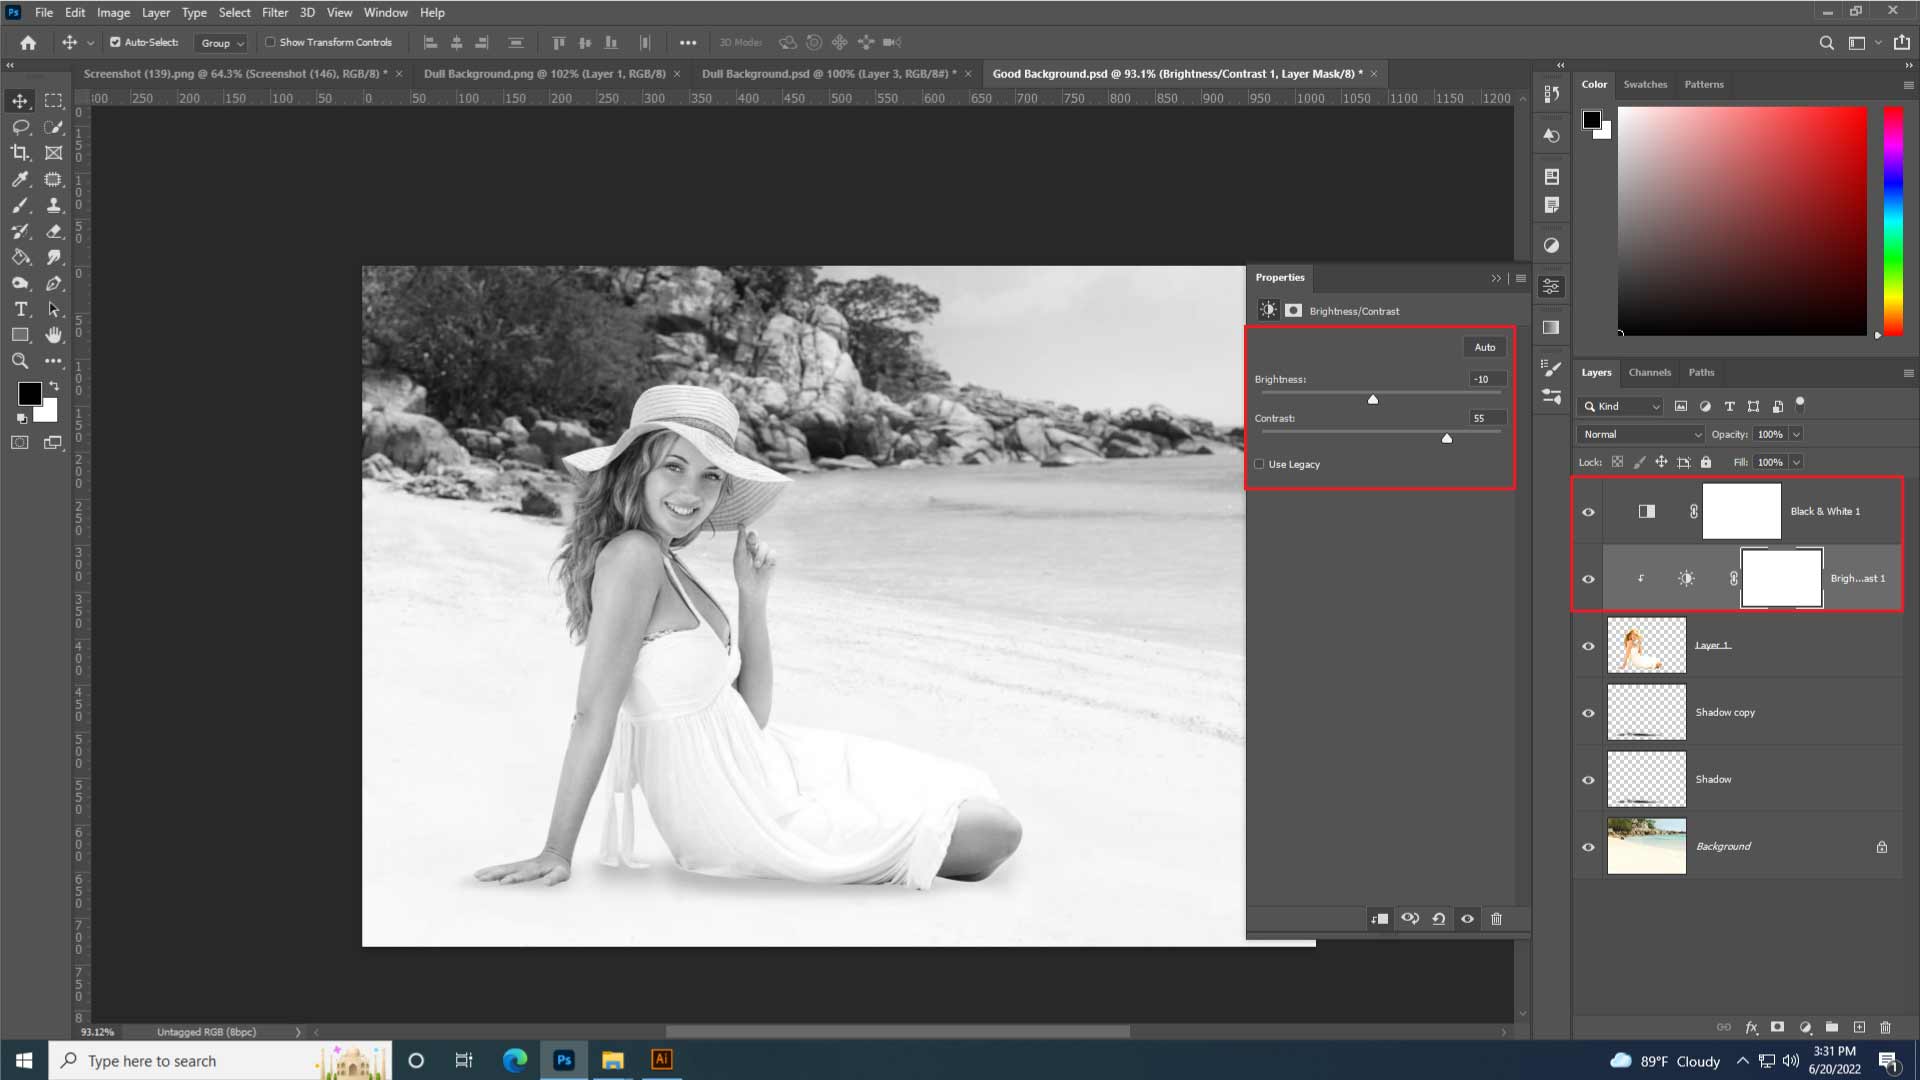
You can create a Black and White adjustments layer first, allowing you to compare the recovered level’s contrast and brightness to the scene image. Once the brilliance and sharpness are adjusted, you can delete the ‘Black and White’ adjustments layer.
To achieve this, click the ‘Adjustment Layer’ button at the bottom of the Layers palette in the Layers Panel after selecting the layer containing the extracted subject layer.
However, you can easily activate the ‘Adjustment Layer’ by holding the ‘Alt Key’ and then clicking on it. Make sure the ‘Adjustment Layer’ only affects the layer underneath it and not the other layers by doing this:
Just play with the brightness and contrast settings until you find a ‘setting option’ that fits the picture’s luminance and contrasting levels.
- View more how to deselect in photoshop
Step#8: Modifying Color Balance:
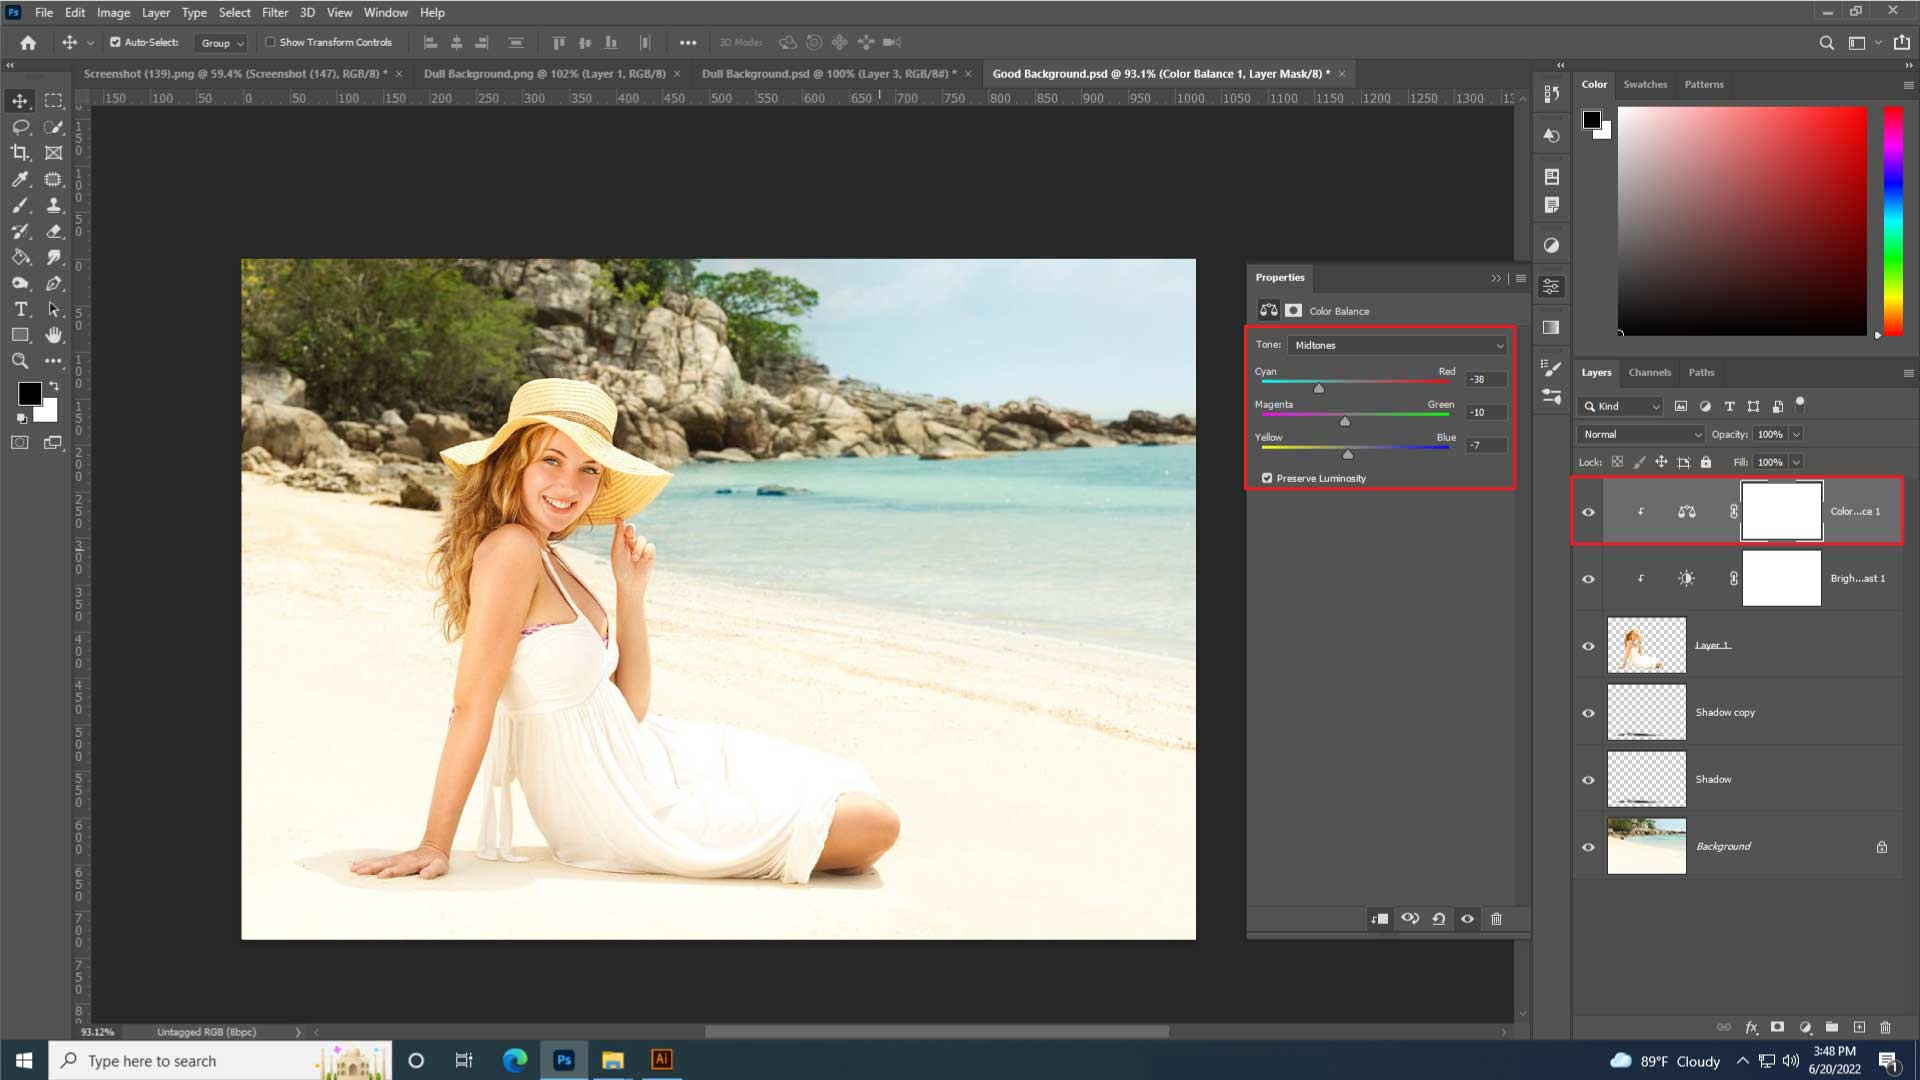
In addition, alter the color balance to match the backdrop color. Creating a color balancing layer and boosting the color of the extracted subject will help you achieve the desired effect if the whole picture is bluish. Be cautious not to overplay it with the color balance.
You can reactivate the ‘Color Balance’ adjustment layer and below layer by holding Alt/Option while clicking on the ‘Adjustment Layer’ and the below layer. If you don’t want to use the Color Balance method to match colors, there is an alternative method that takes only 1-2 minutes to complete.
Step#9: Adjusting Its Blending Configuration To Color:
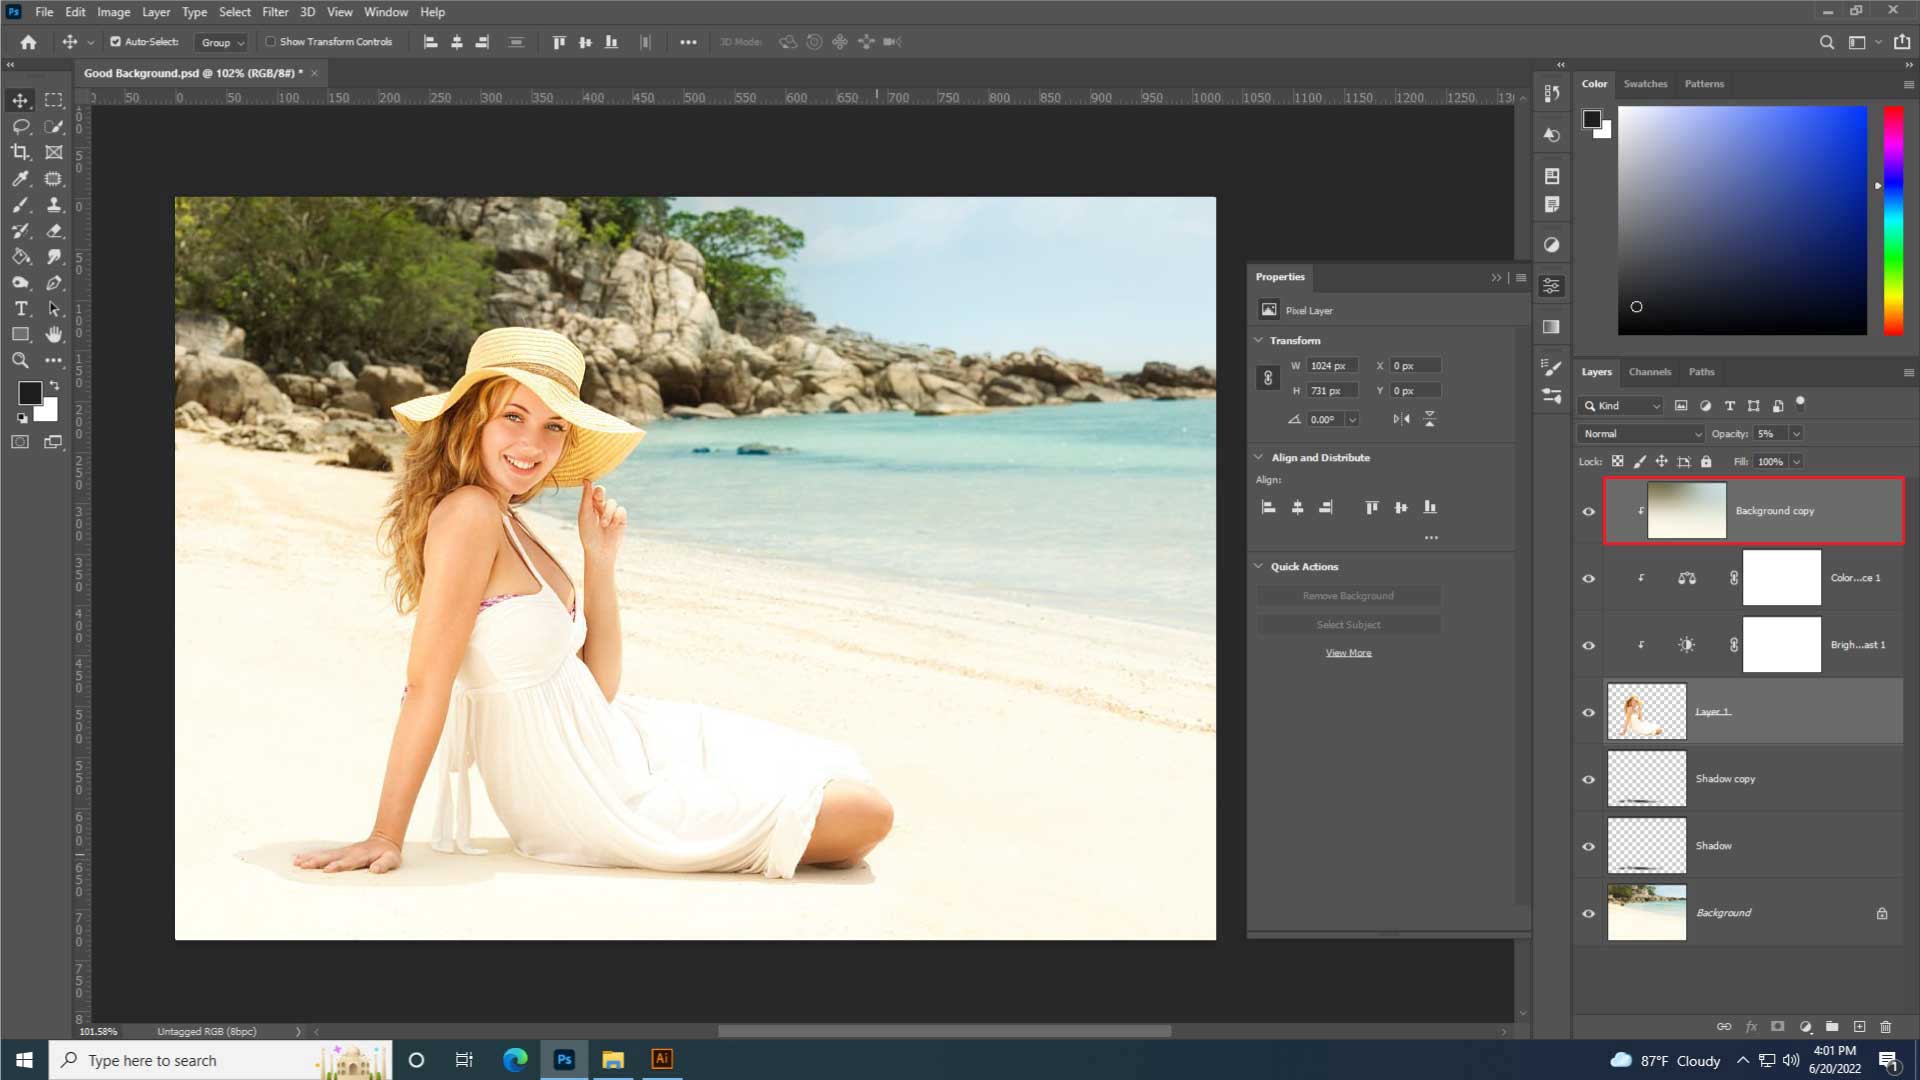
To match the color, you have to copy the backdrop layer and place it above all other layers. Then, right-click and carefully select ‘Clipping Mask’ to turn it into a clipping mask. Then, go to Filters > Blur > Gaussian Blur, and you may apply a 150-pixel Gaussian Blur base on your photo.
Next, adjusting its Blending Configuration to Hue only impacts the topic layer’s color. Opacity should be reduced from 30% to 40% at this point. It saves you time and effort to create a color balancing layer and manually adjust colors.
Step#10: Producing The Final Photography:
This is the final image in which we’ve successfully inserted a person, demonstrating how to Photoshop a picture by following step-by-step instructions. Here, all you have to do is to go through the motions outlined above.
Professional Suggestions: How To Photoshop A Picture Efficiently?
Maybe you locate the ideal setting to photograph people against, but you don’t have a model on hand. Or perhaps you wind up with a fantastic photo of a tranquil beach or a bustling street and wish you had taken a self-portrait there. Here, it’s better to explore new things about how do you photoshop someone into a picture because it’s possible!!
We know that adjusting the colors and exposure of a photograph, removing noise, reducing it to a specific size, and applying filters are all crucial parts of Photoshop. There’re plenty of things to do than that.
Besides that, Adobe Photoshop is a software program that allows all users to modify the pixel level. You can easily change a single pixel in a photo if you want to accomplish it. With that amount of control, it’s no wonder that Photoshop allows you to quickly and effortlessly put someone into a whole new photo.
Last but not least, if you’re looking for a competent photo editing program without all the bells and whistles, we recommend starting with a user-friendly, professional, and high-capable application like Adobe Photoshop or Lightroom.
Enjoy creating a photoshop person into the picture with the above-mentioned easiest steps! Learning is Fun!
Final Thoughts About How To Photoshop A Picture:
In a word, learning how to photoshop a picture effectively and convincingly usually takes some time. In this case, never give up if you don’t get the perfect outcomes of your first-time trial. With that stated, if you ever need to insert a person in entirely other photos, this is a pretty simple and quick way. Just be conscious of the pictures you pick; the outcomes can be as natural as possible.
On the contrary, people usually overlook this procedure. You may change to Photoshop pictures because the photos are to be used before you go through these processes. Rather than insert a person’s snapshot into a landscape with a distinct atmosphere, you can alter one of the two photos to match the color and exposure of the other.
In the end, you can quickly complete this process with simple tools in an application like Adobe Photoshop. Plus, you may even overlay photos in Photoshop to assist you in achieving your desired aesthetic, such as adding a blue sky or other natural things to your landscape.
That’s it. Boom!! Be Cool!
FAQ: [How To Photoshop A Picture]
Q-1: How Can I Get A free Photoshop Picture?
Ans: You can alter images for free with online Fotor’s photo editor in a few clicks. It incorporates all online image editing capabilities that allow you to crop, resize, add text to images, produce image collages, and quickly generate your required graphic designs. You can also watch some basic tutorials about how to crop someone into a photo creatively. It’s simple!
Q-2: How To Edit A Photo In Photoshop?
Ans: To edit your images in Adobe Photoshop, you can follow the basic steps below:
- Insert an image
- Choose a feature
- Make adjustments and run a test
- Save and distribute the file.
Q-3: How Can I Edit A Photo On My iPhone?
Ans: On the iPhone, you can easily edit images and videos. Just follow the below tips:
- To view a photo or video on full screen, tap the thumbnail under Photos.
- Select Edit, and then Swipe left under the image to see the essential effects, including brilliance, exposure, highlights, and shadows as well.
- Now, tap the effect you want to tweak, and then drag the slider to improve it.
Q-4: What Are The Most Reliable Free Picture Editors Online?
Ans: There is a good range of most excellent free photo editors available online, which are pointed out below:
- Taler
- GIMP
- Canva
- Fotor
- Pixlr
- Photoshop Express
Q-5: How To Improve My Self-Portraits Quickly?
Ans: In this case, you don’t need a third-party program to make basic edits to your photos. Because most smartphones have a photo app with all the required image editing tools, simply follow the below tricks:
- Make the adjustments
- Make use of automated settings
- Cut it up
- Choose a filter
- Proper use of a beauty app
- Don’t go too far
- Be inventive
Read Our Latest Articles-
- 25+ Fun and Creative Photoshoot Ideas to Inspire Your Next Shoot
- The Ultimate Guide to Captivating Couple Poses: Unleash the Magic of Love
- Ugly Wedding Rings: Embracing Unconventional Beauty
- Incredible Graduation Photoshoot Ideas and Poses

