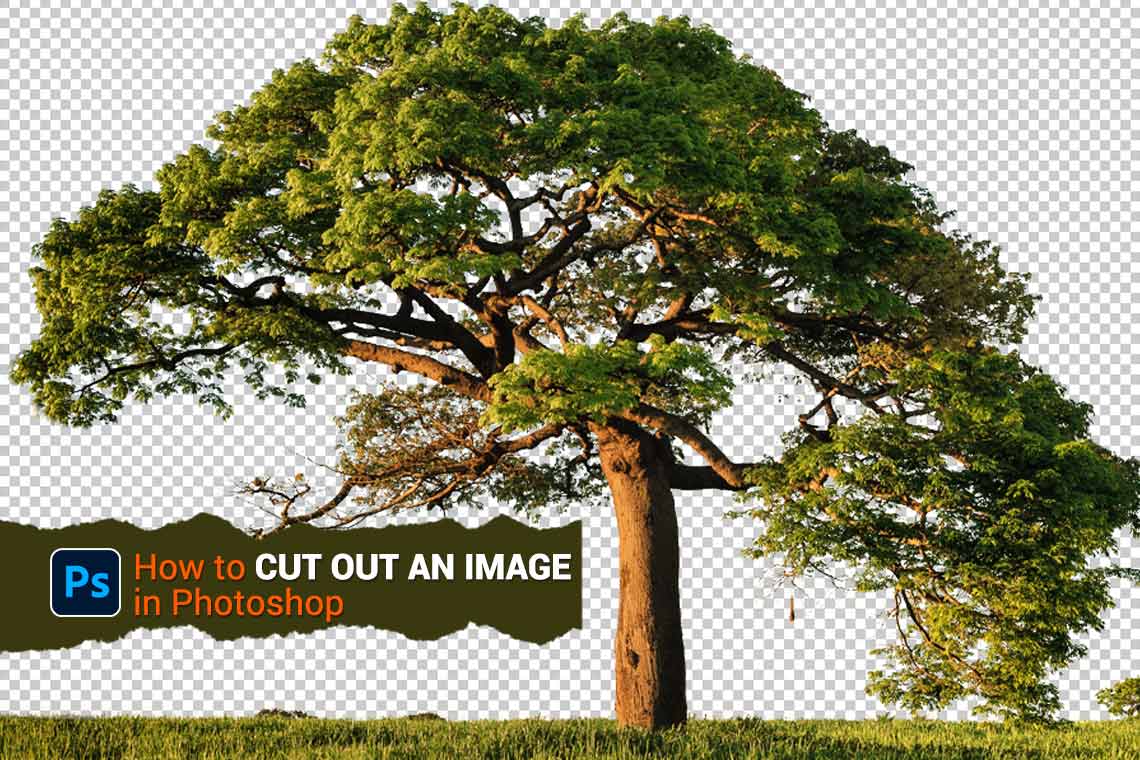
How to Cut Out an Image in Photoshop? It is a fundamental question for you if you are entering the vast world of Photoshop and all it can do. Cutting out an image is one of the most crucial things to learn for someone who is a beginner in the design sector.
Now, what is a cutout image? It may be a question running through your head. So, let us explore that first. An image cut out is when you select a specific subject or object and isolate it from its background. Essentially, the target for cutting out an image is to remove the background so that you can make targeted edits and adjustments to the subject or place it in another background or design work.
So, now that I have your attention regarding how important it is to know cutting out in Photoshop. Let us discuss How to Cut Out an Image in Photoshop.
Relevant Article: How to Photoshop Someone out of a Picture | The Easy Method
The 5 Best Methods for How to Cut Out an Image in Photoshop
Even though there are many Image Cut Out Services, it is always best to have a working knowledge of removing the background of an image. This blog will teach you the best ways to select different subjects or objects and create Photoshop cutouts. Let us look into the various selection methods you can use and how to create a cutout image from that:
1. Use the Quick Selection Tool
As the name suggests, it is one of the quickest and simplest methods to make a selection in Photoshop for cutting out an image. It is a valuable tool when you have defined edges that Photoshop can identify to make a selection. It works by identifying similar tones until it reaches the edges.
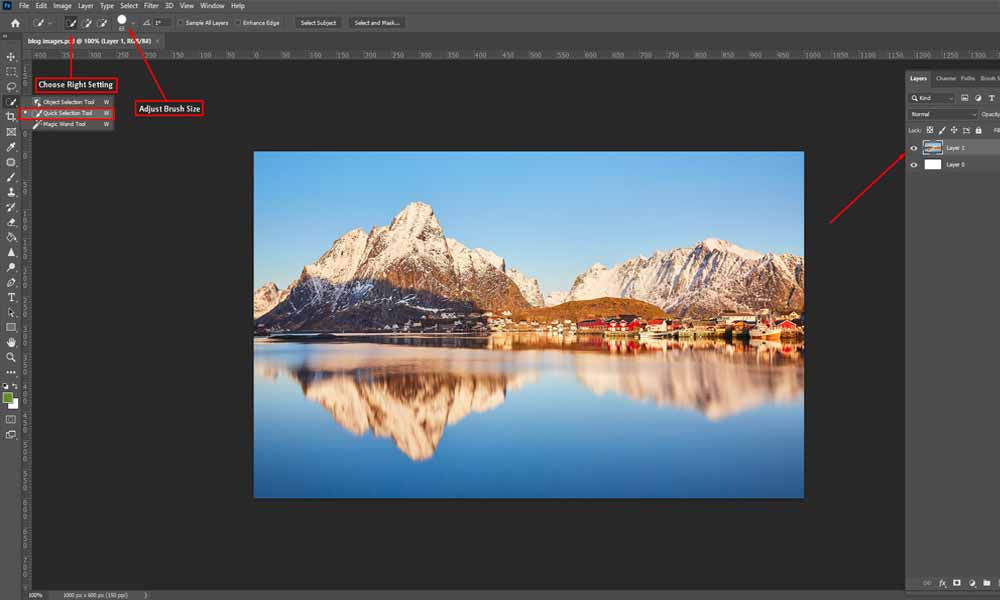
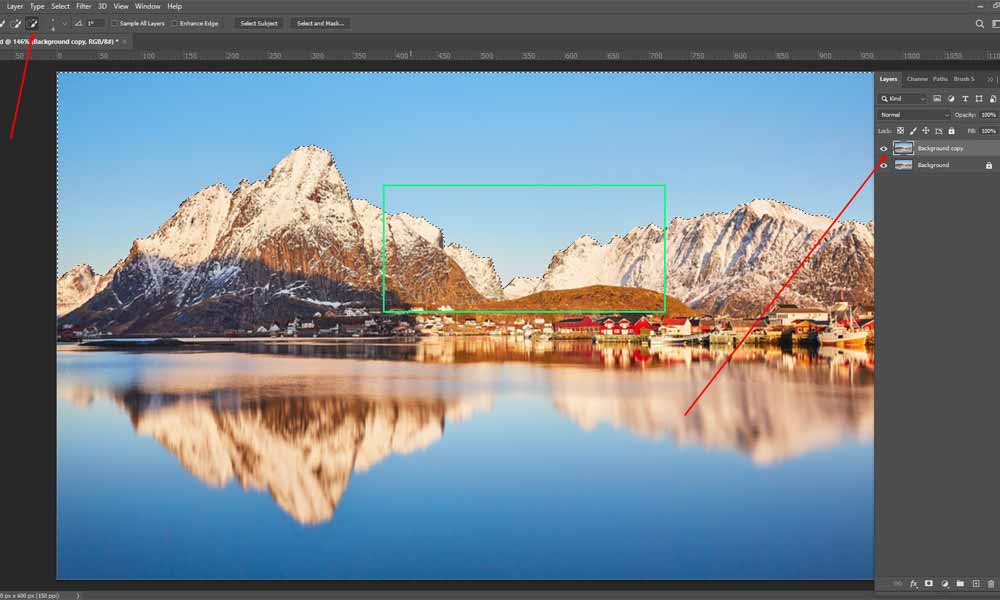
The image below shows a clearly defined separation between the mountain range and the sky. With this selection method, you can easily select, remove the sky as it is of a similar tone, and isolate the mountain range.
Receive professional image manipulation service for about $1.00 per photo.
How do you use the Quick Selection Tool?
The first step is always to choose the tool you want to use. In the toolbar on the left, select the Quick Selection Tool. Moreover, you can even press the “W” key on your keyboard for the keyboard shortcut. Also, always check that the correct setting is used for the tool.
Furthermore, you can adjust the brush size for the Quick Selection Tool to select even the smallest area. To adjust the brush size, press “]” to increase the size of the brush and “[” to decrease it.
Learn more about How to Remove Watermark from Photo: A beginner’s friendly Guideline
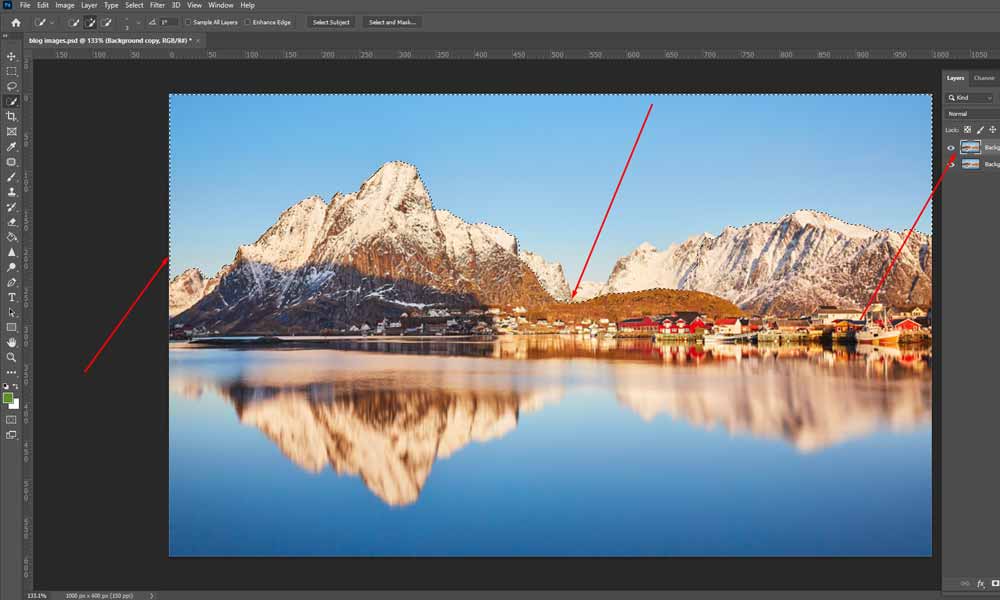
Next, you can click and drag on the sky. Photoshop will automatically identify similar tones in the image and stop at the sky’s edges where it meets the mountain range. You will know that your selection is made when you see a dashed line around the area you want to select. The term used for this dashed line is “Marching Ants.”
Check out The How to for Double Exposure in Photoshop Made Easy
Although the Quick Selection Tool does a decent job at identifying the edges, it is not unexpected that you will not have a perfect selection the first time. Sometimes, there will be sections of the selection area you would like to add or subtract from the selection.
Guide to Master Photoshop Color Replacement with these 3 Easy-to-Follow Techniques
To subtract, you can choose the brush with a minus sign on it from the tool settings bar that appears on the top, or you can press and hold the “Alt” key for Windows or the “Option” key for macOS. You will see a minus sign on your selection brush, indicating that you can subtract the areas you don’t want in your selection.
Find out more about How to Add Fonts to Photoshop – The Detailed Guide
How to Cut Out an Image in Photoshop with the Quick Selection Tool?
So far, you have learned how to make a selection using the Quick Selection Tool, but you need more than that. You need to be able to use that selection to isolate the subject and remove the background to get a cutout image.
To isolate the subject, you will learn the non-destructive method, where the background is still available so that you can return to it instead of completely removing it. You can use a Layer Mask for this purpose.
What is a Layer Mask?
It is a reversible way to hide part of an image or layer without permanently eliminating it. You can use Layer Masking for targeted edits without affecting the entire layer, isolate an object without affecting the background, or modify the background without affecting the subject.
How do you use Layer Masking to make an image cut out in Photoshop?
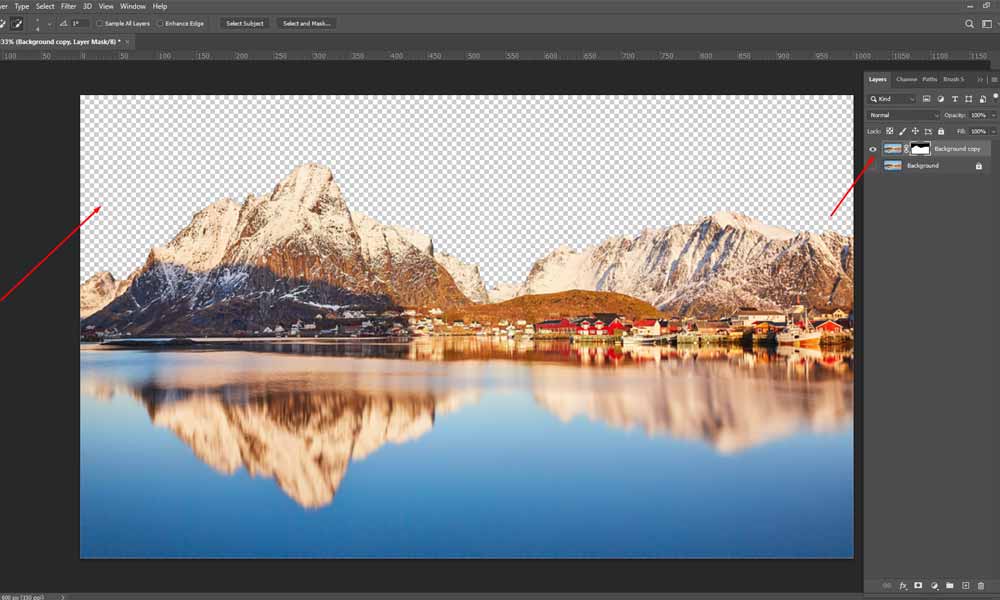
At the bottom of the Layers Panel, you will find the “Add a mask” button. Click this button when there is an active selection. It will create a Layer Mask and isolate the selected subject. In our case, the sky was the active selection, so the sky will be isolated when the “Add a mask” button is pressed.
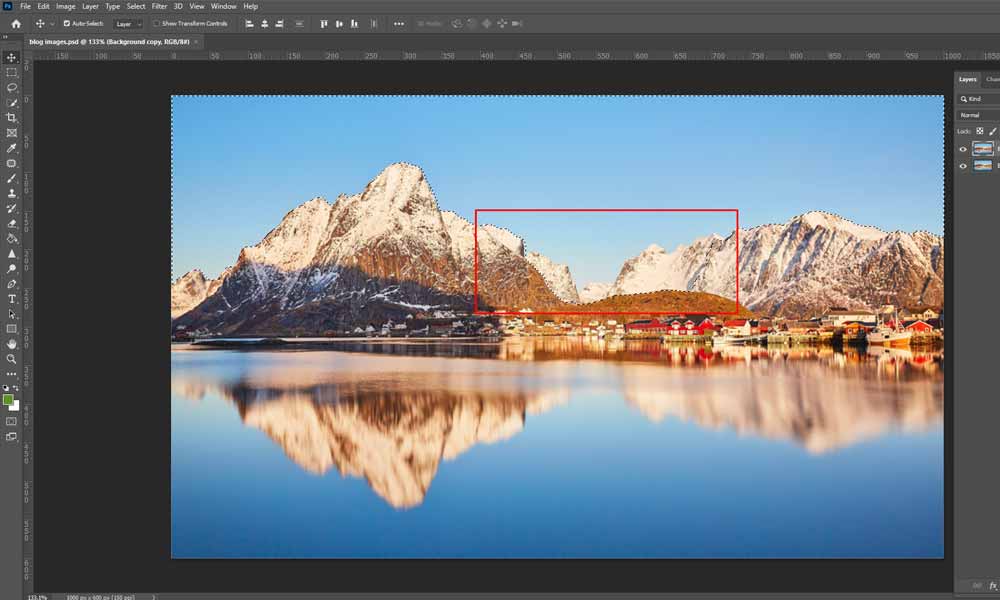
However, selecting the sky is not our intended target. We need to isolate the mountain range for our purpose. So what steps must you take to isolate the mountain range? You will need to invert the active selection to select the mountain range instead of the sky.
To invert the selection, go to the “Select” menu on the top menu bar and choose “Inverse” from the drop-down menu. Alternatively, you can use the keyboard shortcut (Ctrl+Shift+I) for Windows or (Cmd+Shift+I) for macOS. Once the selection is inverted, use a Layer Mask to isolate the mountain range.
See: A Complete Tutorial for How to Resize an Image in Photoshop
How can you tell which area is hidden by looking at the Layer Mask? When a Layer Mask is created, you can see that a particular portion is black and the rest is white. The white part is the visible part. That is, it is the cutout image. And the black part is the hidden part.
2. Use the Magic Wand Tool
The Magic Wand Tool is another selection method that can help you to select and isolate the subject quickly. This tool looks at the color and tone in the image. It selects pixels with similar colors and tones for making the selection. However, unlike the Quick Selection Tool, the Magic Wand Tool selects similar hues in the entire image instead of identifying the edges.
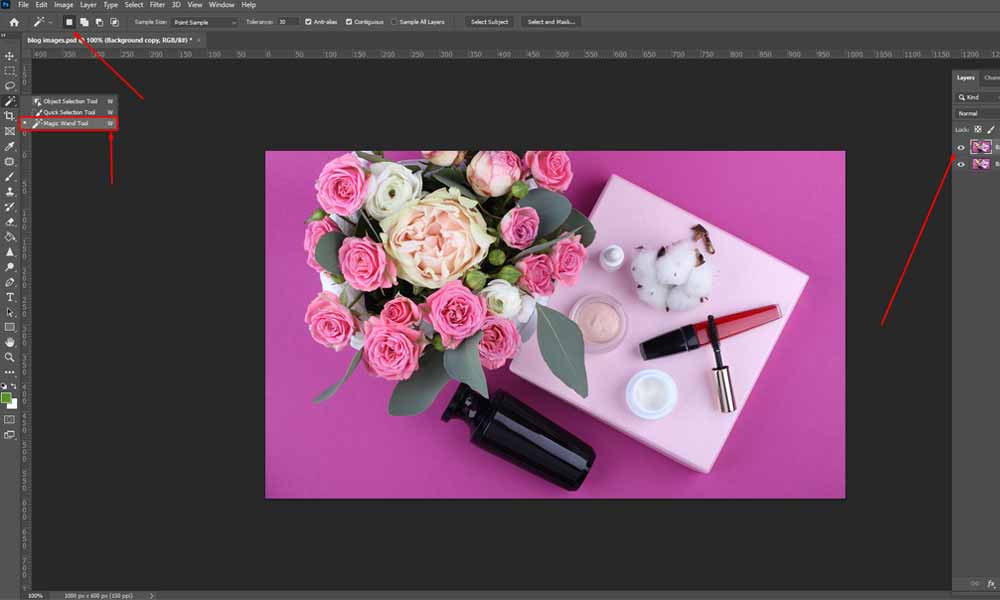
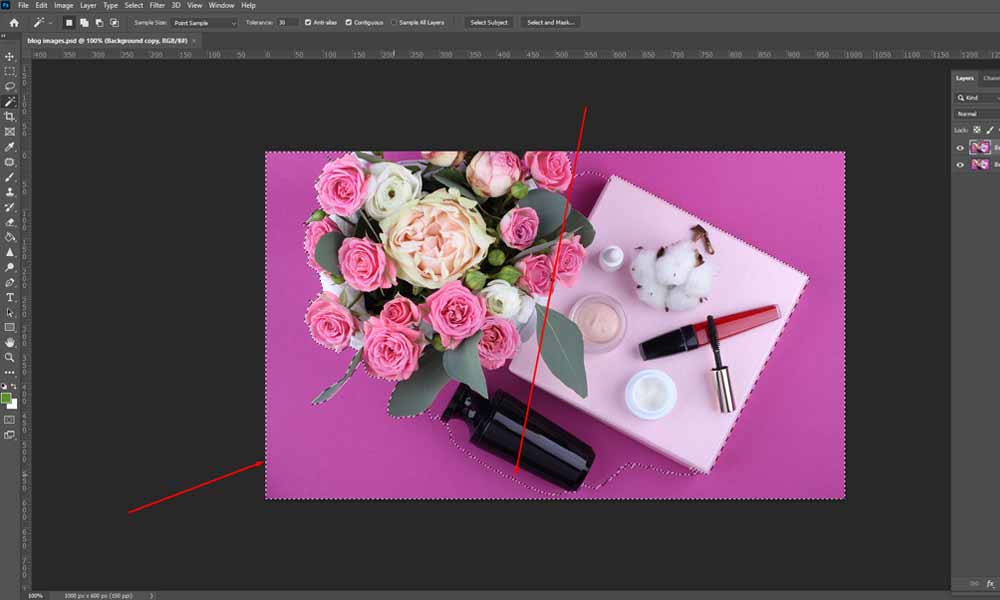
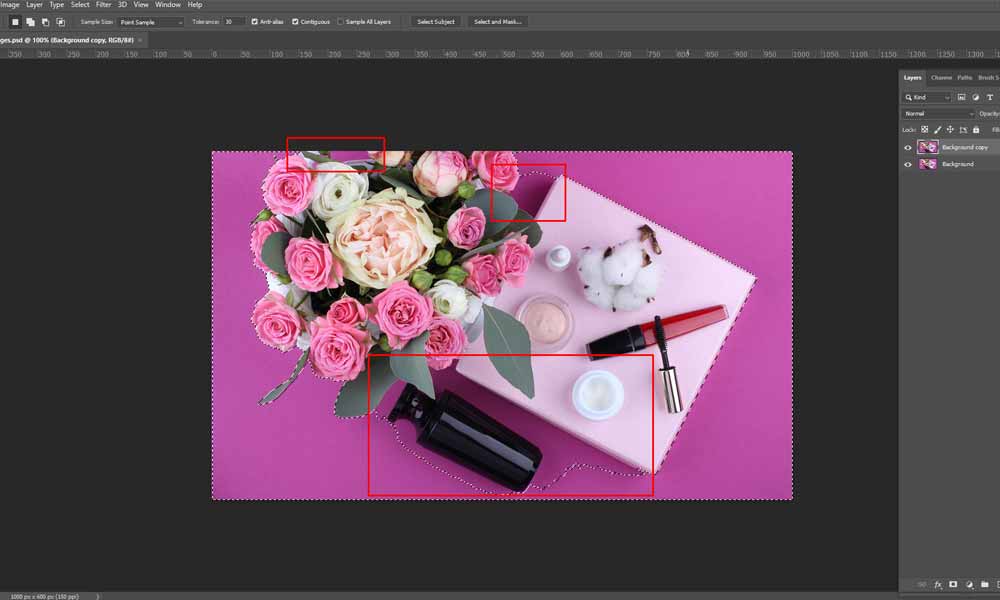
The image below shows that the background is of a similar color and tone throughout the image. The Magic Wand Tool can select the background and isolate the flowers, vase, and gift box.
View: How Easily You Can Make A Background Transparent in Photoshop
How do you use the Magic Wand Tool?
The first step is to choose the Magic Wand Tool. Where will you find this tool? In the toolbar on the left, click and hold on to the Quick Selection Tool. It will reveal the other options under it, i.e., “Quick Selection Tool” and “Magic Wand Tool.”
However, the Magic Wand Tool will appear as the primary option in the toolbar if you have previously selected it. In that case, you can press the “W” key to use the keyboard shortcut. Furthermore, always make sure to start working with the correct setting from the tool setting bar on the top.
Learn more: Pro Tutorial: How To Photoshop A Picture? [10 Steps]
Next, you can click anywhere on the background, and Photoshop will automatically select pixels similar in color and tone in the entire image. You can see the dashed line to identify the selected area.
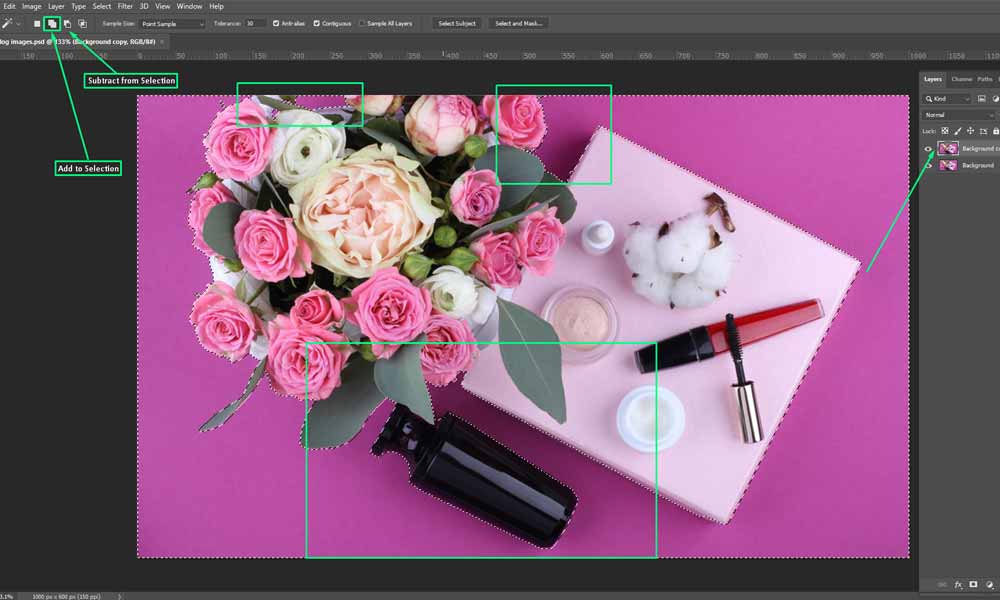
Like the Quick Selection Tool, the selection will not be perfect on the first attempt. You can add or subtract the active selection to the complete selection you want.
View more about How To Remove a Background in Photoshop Quickly and easily
To add to your active selection, you can choose the two solid squares from the tool settings bar on the top or press and hold the “Shift” key for both Windows and macOS. A plus sign will appear on the wand, indicating that you can add to your selection.
To subtract from your selection, you can choose the single solid and single transparent square from the tool settings bar on the top, or you press and hold the “Alt” key for Windows and the “Option” key for macOS. A minus sign will appear on the wand, indicating that you can subtract from your selection.
Find out more about How To Do Color Correction In Photoshop. [Best 2 Proven Methods]
How to Cut Out an Image in Photoshop with the Magic Wand Tool?
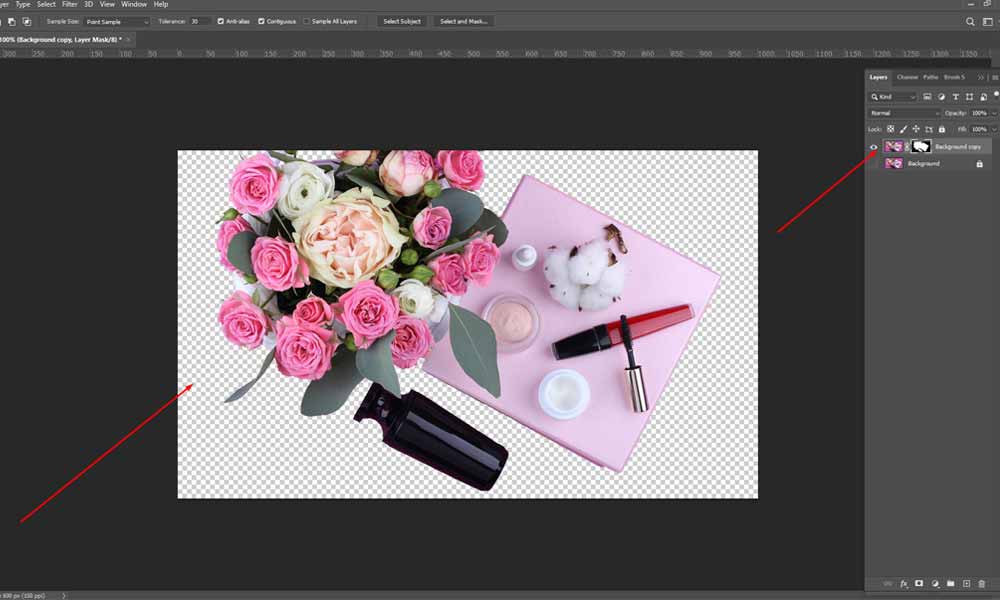
Thus far, you have learned to use the Magic Wand Tool to select the image’s background. Since it is a good practice to use the non-destructive method for cutting out in Photoshop, we will also use Layer Mask for this selection method.
However, our target is to isolate the flowers, vase, and gift box instead of the image’s background. To isolate those items, you must invert the selection precisely as we have learned for the Quick Selection Tool. Choose “Inverse” from the “Select” menu or use (Ctrl+Shift+I) for Windows or (Cmd+Shift+I) for macOS. Once the selection is inverted, use the Layer Mask by clicking the “Add a mask” button.
Read more about How To Take Pictures Of Shoes
3. Use the Magnetic Lasso Tool
Magnetic Lasso Tool, as the name suggests, has the property of snapping onto the object’s edge like a magnet by looking at the brightness and contrast of the pixels. It is a valuable tool when you have clearly defined edges in a high-contrast background.
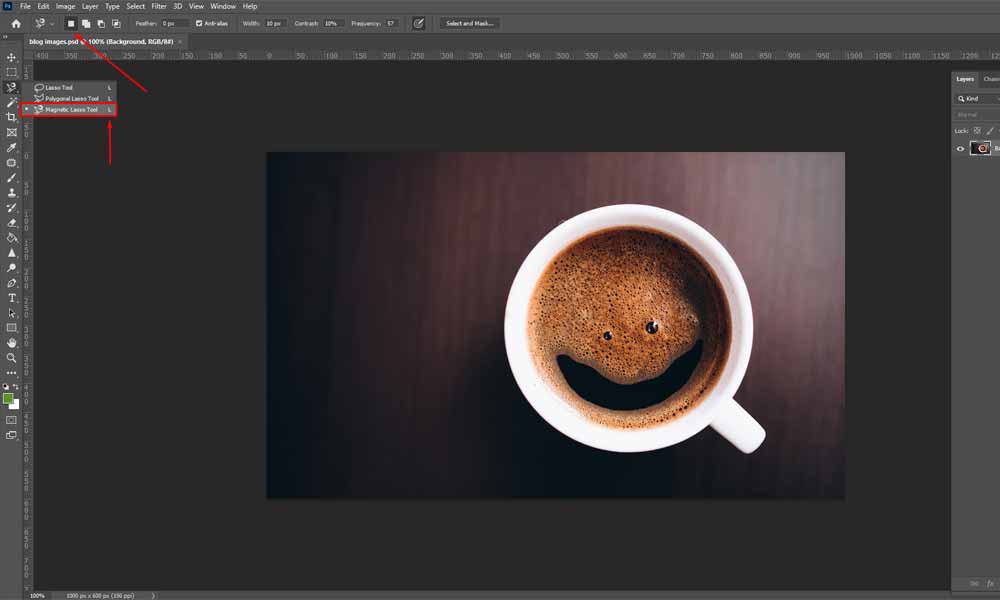
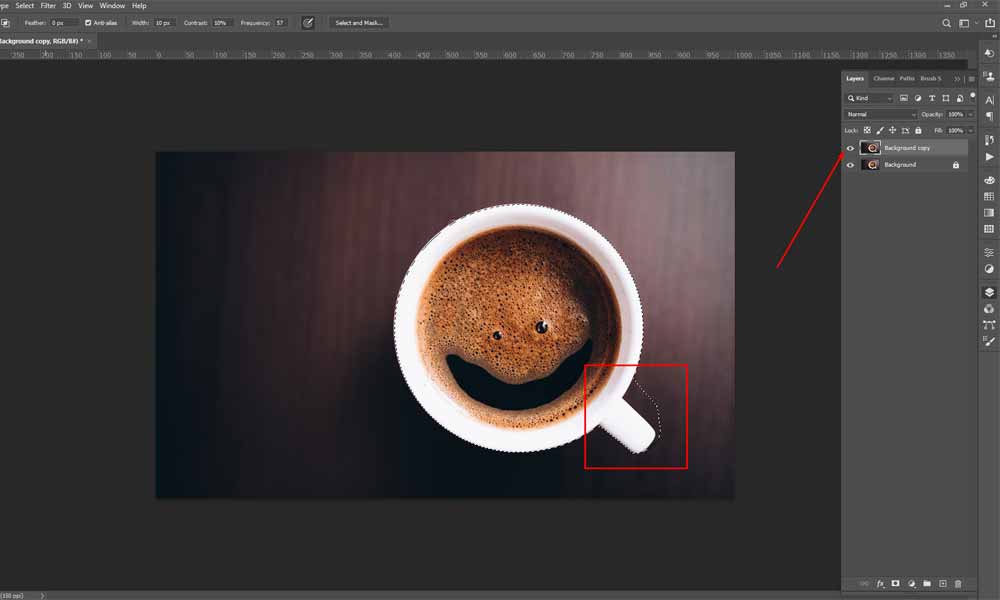
The image below shows that the coffee cup has defined sharp edges in a high-contrast background. The Magnetic Lasso Tool can easily snap to these edges and make the selection.
Receive professional Photoshop shadow service for about $0.25 per photo.
How do you use the Magnetic Lasso Tool?
The first step is to choose the Magnetic Lasso Tool. You can find this on the left side of your workspace in the toolbar. You must click and hold on to the Lasso Tool. It will show the options within the tool, i.e., “Lasso Tool,” “Polygon Lasso Tool,” and ” Magnetic Lasso Tool.”
If you have previously used the Magnetic Lasso Tool, pressing the “L” key on the keyboard will let you access this tool. Moreover, you must check that you are using the right setting for the tool before making a selection.
Check out Image Masking: What, How, And Why?
Next, click anywhere on the edge of the cup and go around the edge till you come back to the origin to complete the selection. The tool will automatically snap to the cup’s edges as there is a high contrast between the background and the object. You have successfully made a selection when the dashed lines appear.
Read more about How To Edit Waterfall Photos
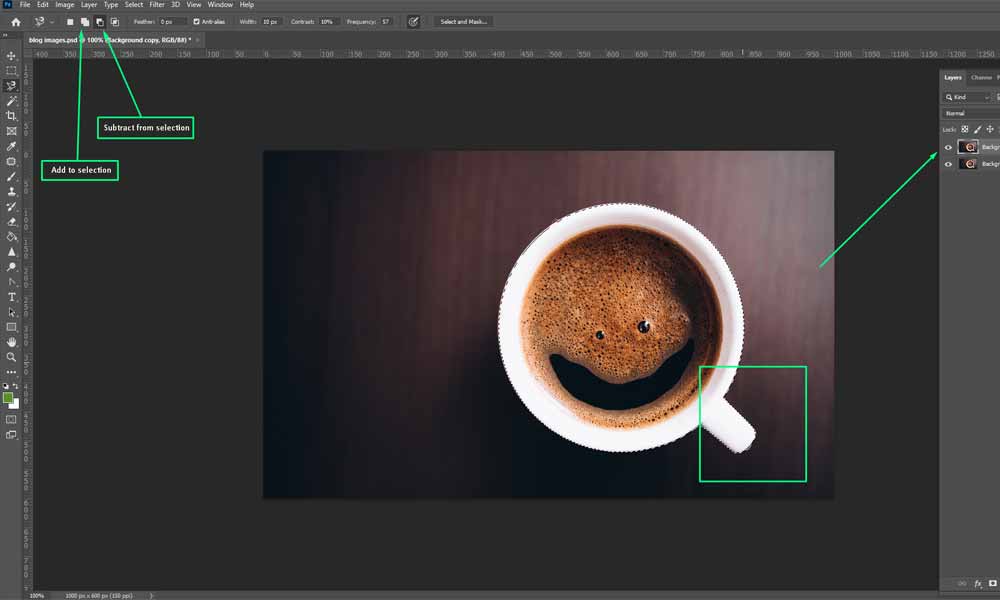
Now, like the other two selection methods mentioned above, it is expected not to make the perfect selection the first time, even with this tool. You can add and subtract unwanted areas from the active selection to get the selection you are looking for.
Like the Magic Wand Tool, you can choose the two solid squares from the tool settings bar on the top to add to the active selection or press and hold the “Shift” key for both Windows and macOS. A plus sign on the tool indicates the right setting for adding to the selection.
For subtracting, you can choose the single solid and single transparent squares from the tool settings bar on the top or press and hold the “Alt” key for Windows and the “Option” key for macOS. A minus sign will appear on the tool, indicating that you can subtract from your selection.
Check out Why Do You Need Image Manipulation For Your eCommerce Business
How to Cut Out an Image in Photoshop with the Magnetic Lasso Tool?
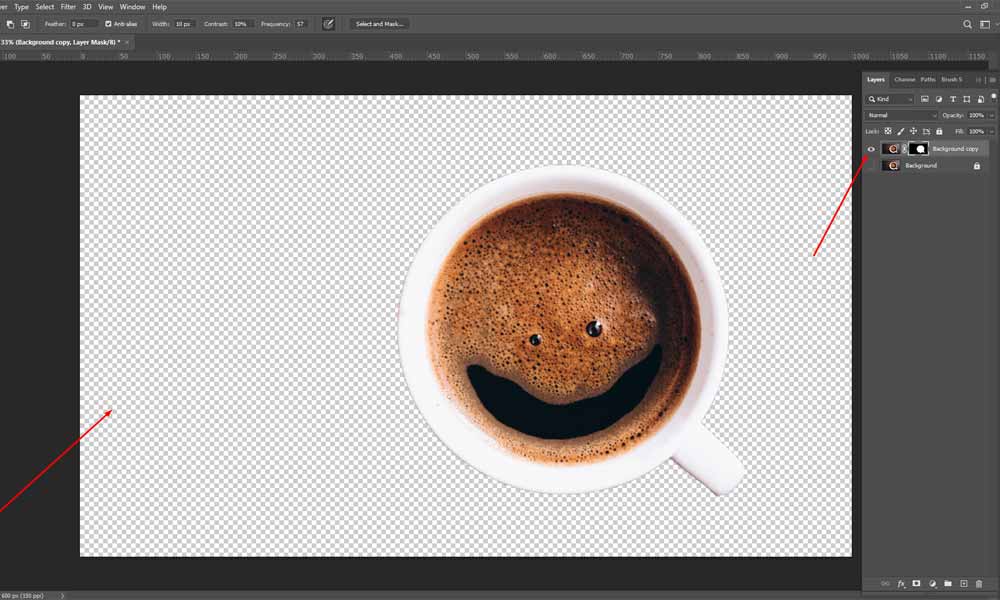
Now that you know how to make a selection with the Magnetic Lasso Tool, you must learn how to use the selection to make Photoshop cutouts. As discussed in this blog, we will use the non-destructive method to isolate the object from its background.
However, unlike the previous two selection methods, for the Magnetic Lasso Tool, the active selection is of the object itself. Thus, inverting the selection is not necessary. Click on the “Add a mask” button from the bottom of the Layers Panel, and your object is isolated using Layer Mask.
Guide to The 12 Best Background Removal Service Providers in 2023
4. Use the Pen Tool
The Pen Tool gives you the most control over what you are trying to isolate, as it is up to you to outline the object to make the selection. It is the most accurate way to make a Photoshop cut image as it gives you the sharpest edge for your selection. However, it is also the most tedious method to make a selection.
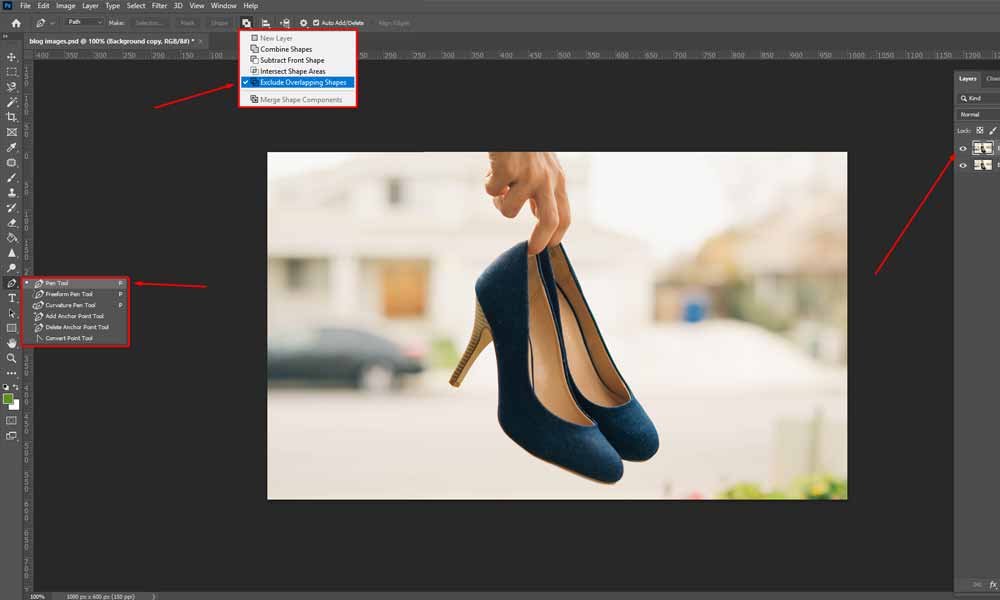
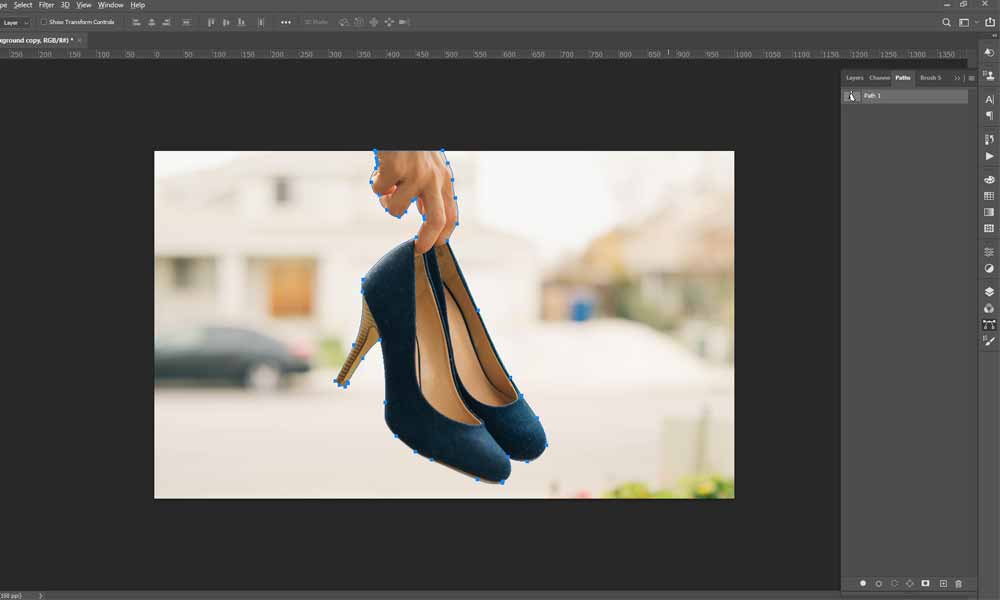
With the image below, you can use the Pen Tool to create an outline of the hand and the heels to isolate them from the background. This outline is called a “Clipping Path.”
How do you use the Pen Tool?
The first step is to choose the Pen tool, which you will find in the toolbar on the left, or press the “P” key on your keyboard. Always check that the correct setting is used for the tool.
Next, you must start drawing the Path around the hand and the heels. To do this, start from anywhere on the edge of the subject you want to isolate for the Photoshop cut image. When you click on the edge of the subject, a point will appear; this is called an “Anchor Point.”
Consecutive points are connected with a line, and you must go around the edge of the hand and the heels, return to the starting point, and close the Path at the origin. However, by just clicking the points around the subject, you are not getting a smooth path, as the points are connected with a straight line and are not curving with the curve of the object.
So, what is the solution for getting the curved Path? Instead of just clicking the points, you must drag the mouse along the edge of the subject while adjusting its height and intensity. You can adjust the height by dragging the mouse up and down, and by dragging it left to right, you can adjust its intensity.
Go around the edge of the hand and heels, create a curved Path wherever needed, and return and close the Path at the origin.
Find out more about How To Edit Newborn Photos in Adobe Lightroom.
How to Cut Out an Image in Photoshop with the Pen Tool?
For the other selection methods mentioned in this blog, the selection is made as the area is selected, and the dashed lines appear to indicate the selection.
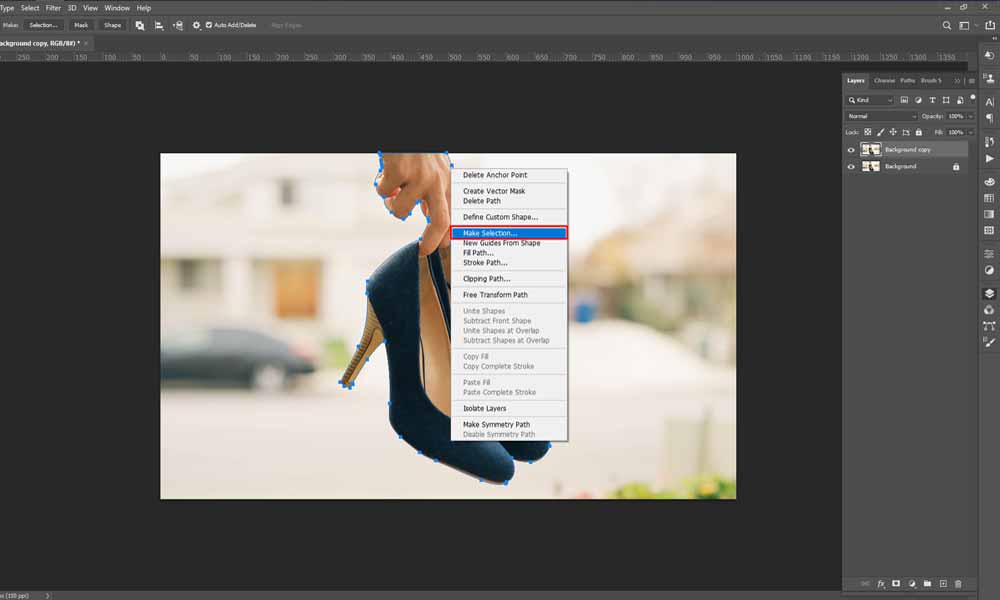
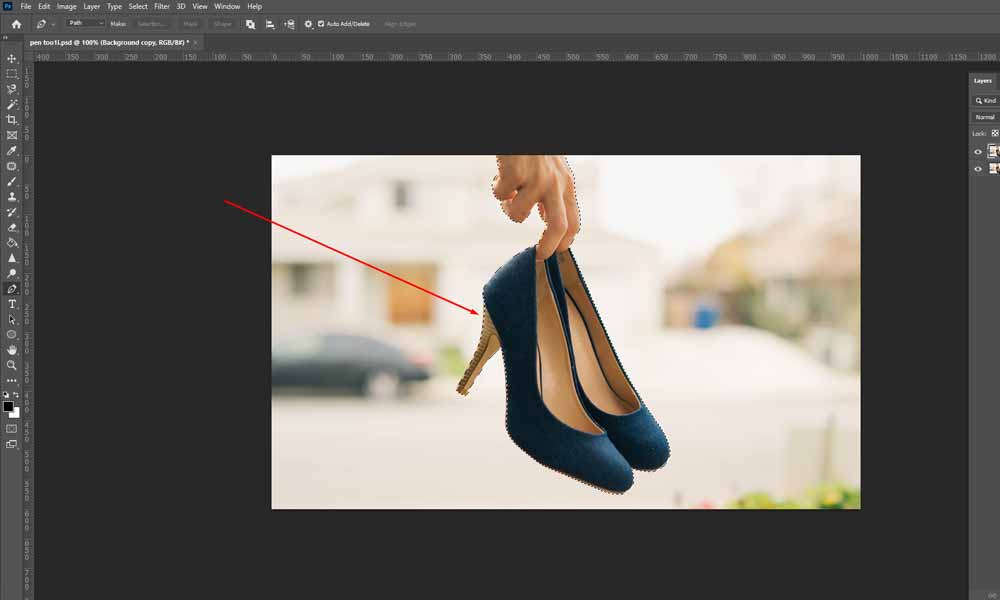
However, the Pen Tool is different. For the Pen Tool, you will have to make the selection yourself. You can do this by clicking the right mouse button inside the Path Area, and a drop-down menu will appear. Select “Make Selection” from that list, and the dashed lines indicate that the selection has been made.
Check out the list of Product Image Editing Methods For Amazon
Another method to make the selection with the Pen Tool involves going to the Paths Panel. You will see that a Work Path was created when you drew your Path around the subject. To make the selection, you must press the “Ctrl” key or the “Cmd” key and click on the thumbnail on the Work Path. The dashed line will appear, indicating that the selection has been made.
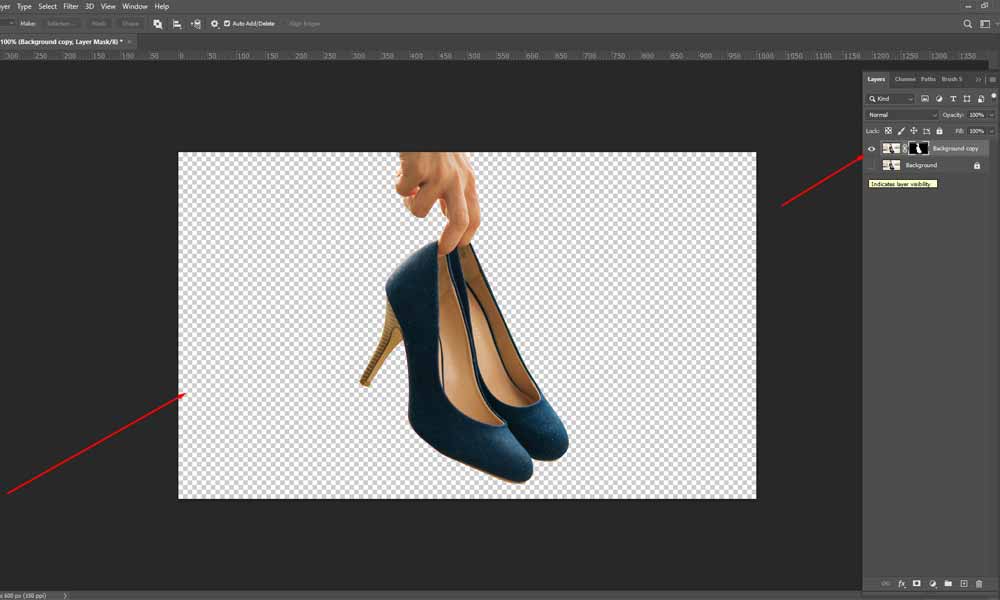
Now that the selection has been made, we can use the non-destructive method of removing the background using the Layer Mask. As the subject itself is selected, you will not need to invert the selection. You can create the Layer Mask and isolate the subject from its background by clicking the “Add a mask” button.
View more Top 07 World-Class Photoshop Image Retouching Provider Company
5. Use the Alpha Channel method
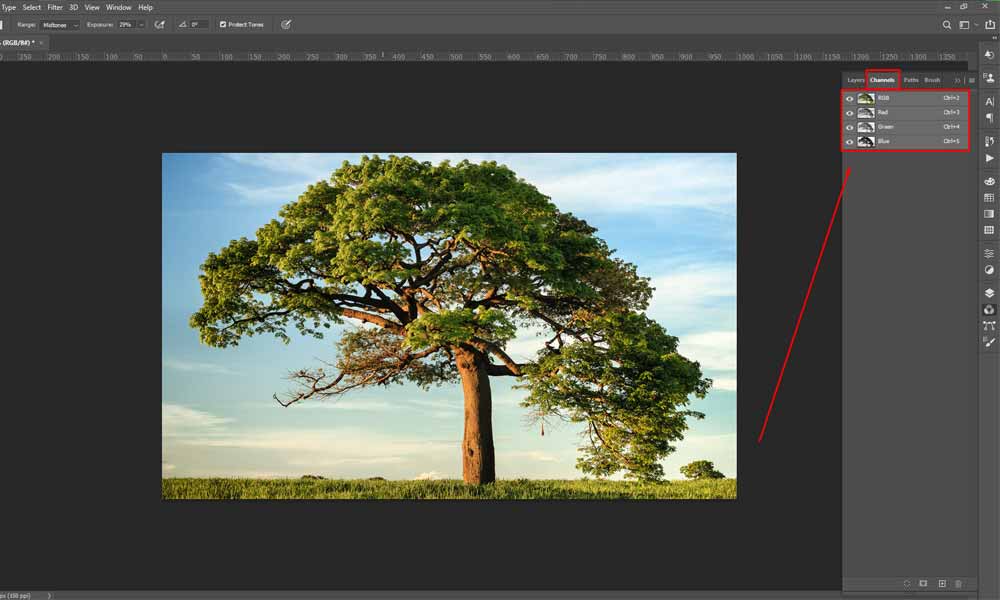
Colors in a digital image are a combination of Red, Green, and Blue. When you open an image in Photoshop and check the Channels Panel, which you can find under the “Windows” menu, you will see that your image is broken down into three Channels: Red, Green, and Blue. And at the top of these Channels is the RGB Channel comprising all the colors together.
Each color Channel comprises pixels representing their primary color as white and the complimentary colors as black on the grayscale. When you view these three grayscale channels individually, they are of varying levels of contrast that you can use to make complicated Photoshop cutouts accurately.
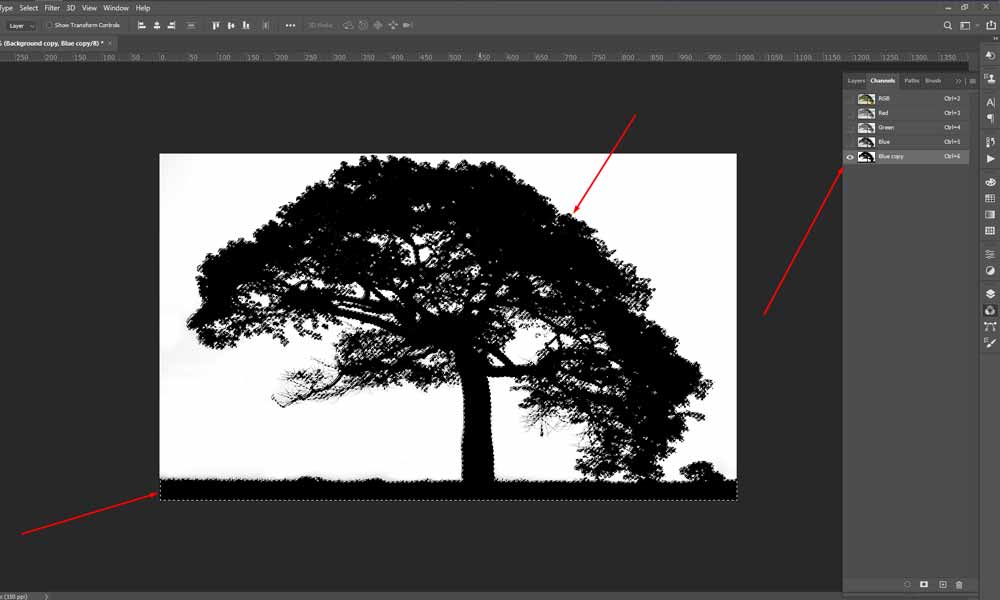
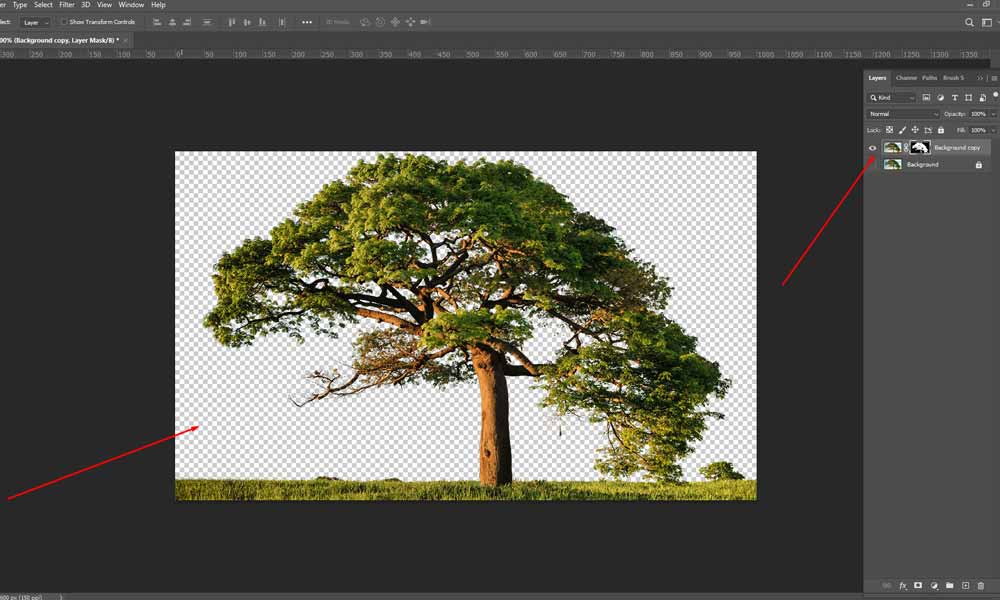
In the image given below, we will use Channels to separate the tree and the field from its background. Using Channels, we can remove the background effectively, as removing the background in the gaps between leaves is very complicated.
How do you use the Alpha Channel method?
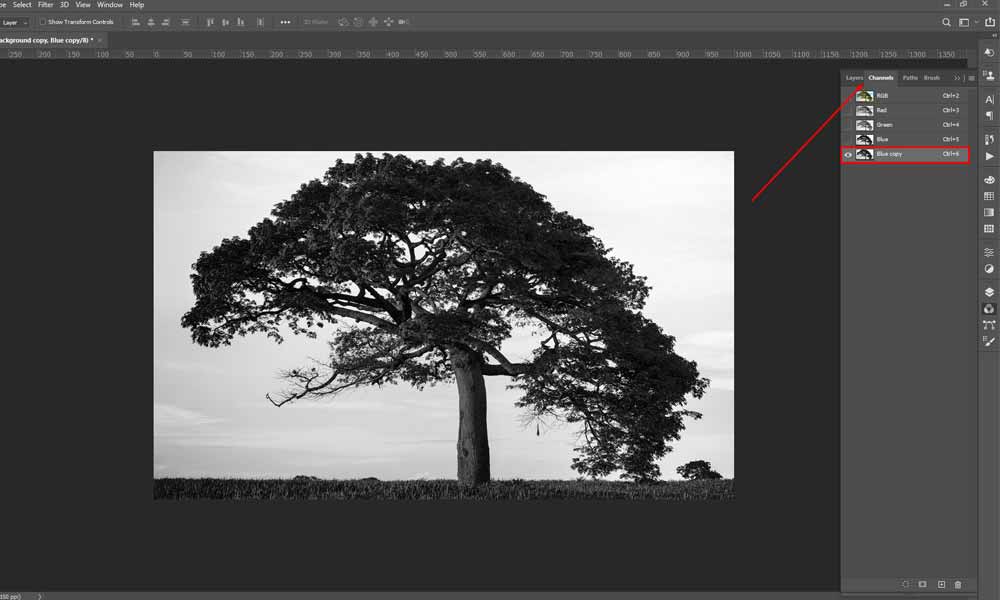
When using Channels, you must first decide which Channel will give you the best output for cutting out in Photoshop. You can do this by checking the contrast in each Channel. The Channel that gives you the highest contrast is usually the one you will need to use. That is, it has the greatest separation between the background and foreground, where the subject appears darker than the other Channels.
When you have decided on the Channel you want to use, make sure not to work on that Channel itself, as it will effectively destroy the colors of the image. So, always take a copy of the Channel you want to use. For our image, we are using the Blue copy.
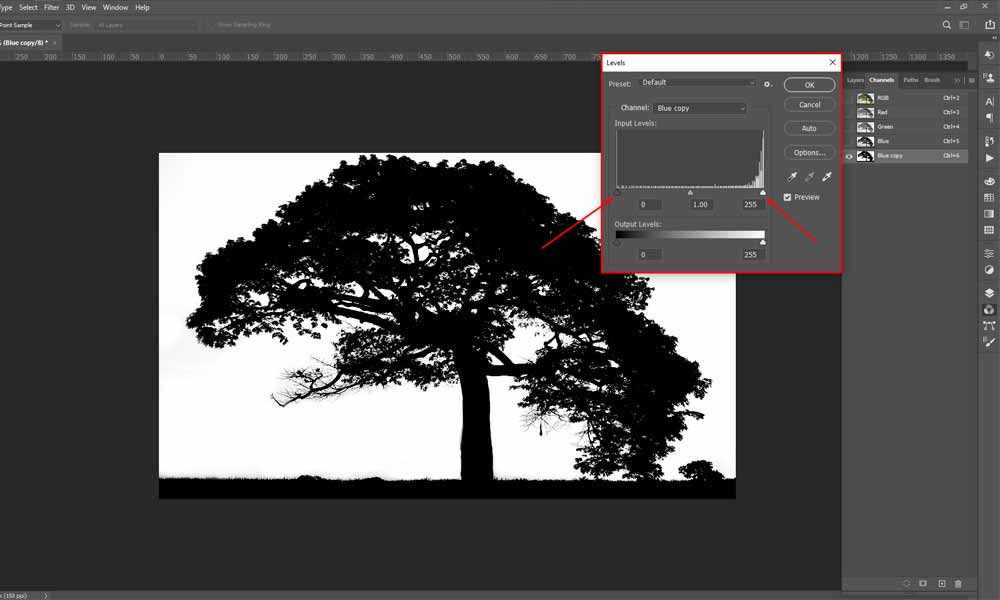
Once you have taken a copy of the Channel, your image will appear in grayscale. Now you must use the Levels Tool to increase the dark areas of the images while making the lighter areas white. In our case, the sky will become white, while the tree and the field will become black.
How to Use the Levels Tool?
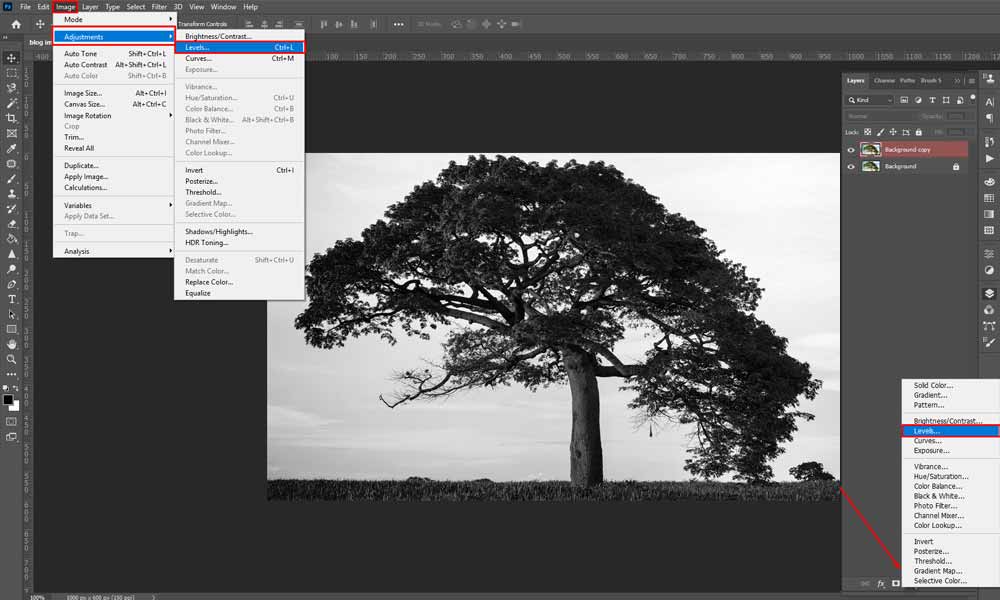
You can access the Levels Tool from the “Image” menu from the top menu bar and select “Adjustments” from the drop-menu and select “Levels,” or you can press the “Create new fill or adjustment layer” at the bottom of the Layers Panel and press “Levels.” However, the easiest way to access the Levels will be by using the keyboard shortcut. That is pressing (Ctrl+L) for Windows and (Cmd+L) for macOS.
Check out 18 Best Clipping Path Service Providers For 2023
Once the Levels Tool is open, you must move the sliders in the Input Levels section. Move the left slider towards the center, and you will see that the dark areas of the image are becoming black. Do not move the slider too far so that the entire image becomes black. Move the right slider toward the center, and you will see the sky area is becoming white. You can press the “OK” button once you are satisfied with your adjustment.
To make it easier to make adjustments with the Levels Tool, you can use the Dodge Tool to lighten the darker areas in the image or the Burn Tool to darken specific areas. Furthermore, you can even use the Brush Tool for this purpose.
See: Why Do You Use Photoshop For Shadow Creation
Now you must go to the Channels Panel, press the “Ctrl” key for Windows and the “Cmd” key for macOS, and click on the Blue copy, and you will see a selection is made. Invert the selection using (Ctrl+Shift+I) for Windows and (Cmd+Shift+I) for macOS.
Go to the Layers Panel, make a copy of your image layer, and click the “Add a mask” button at the bottom. A Layer Mask will appear, and the background will be removed, revealing the cutout image.
Check out Professional Headshot Background Ideas, Tips, and Must-Serve Purposes
Other Pro-Tips for How to Cut Out an Image in Photoshop
1. If it is only natural, you might make a wrong selection accidentally. How do you deselect the entire selection in that case? You can go to the “Select” menu from the top menu bar. A drop-down menu will appear. Click “Deselect” from this menu for the deselection process. You can even use the keyboard shortcut (Ctrl+D) for Windows or (Cmd+D) for macOS for deselecting.
2. Subsequently, if you have accidentally removed a selection, you can reselect it by going to the “Select” menu and clicking on “Reselect” from the drop-down menu or using the keyboard shortcut (Ctrl+Shift+D) for Windows or (Cmd+Shift+D) for macOS.
3. Another helpful trick is to use the universal Undo function, which is (Ctrl+Z) for Windows and (Cmd+Z) for macOS. It is beneficial when you have made a wrong selection and want to go back a step. However, this function won’t work on the Magnetic Lasso Tool.
4. When working with the Pen Tool is good practice to work on a New Path instead of working on a Work Path. It is so because if you have more than one object you want to isolate, then starting a Path elsewhere will delete the Work Path and start a new one.
So, working on a New Path is always best, as this will keep multiple Paths around the image. You can get this from the bottom of the Paths Panel and click on the “Create new path” button.
5. Another good practice is to always work on the copy layer of the original image. By doing this, you can avoid mishaps and keep a backup of the original image.
Watch our Video Tutorial given below!
Wrapping up The Quick Guide to How to Cut Out an Image in Photoshop
We are at the end of the blog on How to Cut Out an Image in Photoshop. If you have read this far, then you are already well-versed in cutting out in Photoshop. Now you can isolate your subjects effectively and remove the background, use it in other design works, or make targeted edits to them. So, use this newly learned knowledge and create beautiful works of art!
Read Our Latest Articles-
- The key secrets to shoe photography
- Explore the Exciting World of Flat Lay Clothing Photography
- Amazon Product Photography and the Tips to Take Them
- Become an Expert in Car Photography with Our Comprehensive Guide
- 15 Real Estate Photography Tips For Beginners to Know
