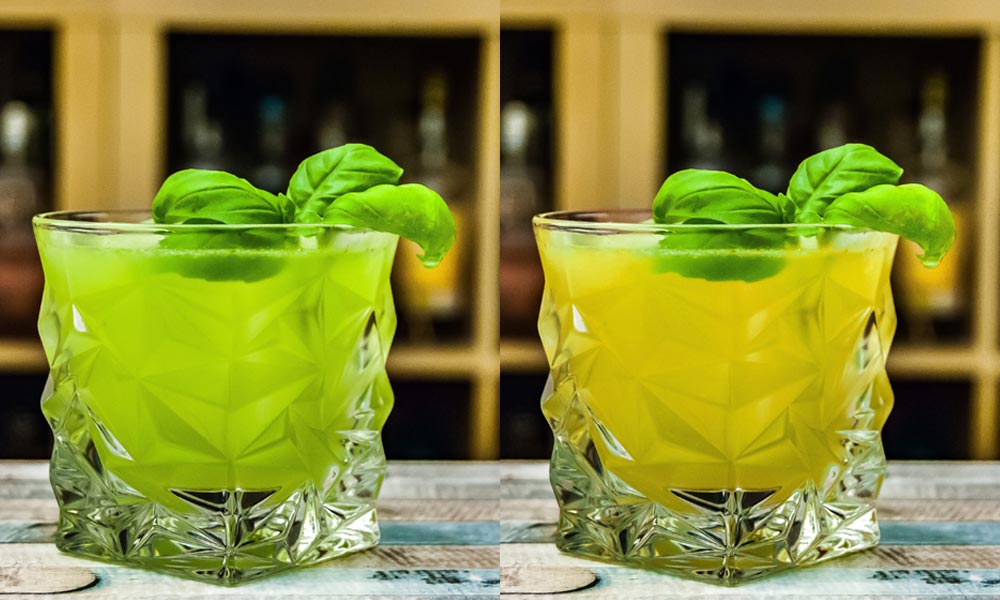
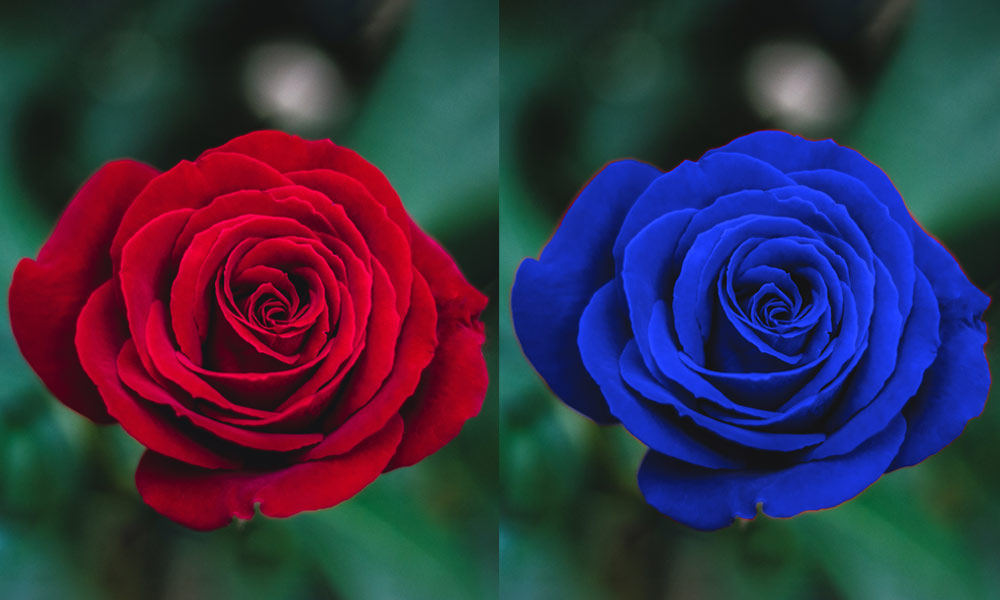
One of the many things you can do in Photoshop is to replace the color of specific objects. Mastering the various Photoshop color replacement techniques can be useful for your design works. If you are reading this blog, you must be new to Photoshop and are curious to master various techniques that you can use to replace the colors of objects in all your design works. With these skills, you can make work stand out and awe your viewers with beautiful works of art.
In this blog, we will discuss three easy-to-follow techniques that you can master in no time. Follow our step-by-step guide for each method, and you will become a pro. Remember, practice is the key to mastering any skill. Just reading through the tutorials can make you think that it is an easy task to handle. But the reality is usually very different. So, practice is the key to success.
So, let us begin this blog by discussing how the techniques you can use to replace the color in Photoshop can be useful to you.
The Usefulness of Photoshop Color Replacement
Now, whether you are doing design work for your portfolio or pursuing a career as a Graphic Designer and Photoshop Expert, you are bound to use color replacement techniques at one point or another for your design works. Whether you are trying to manipulate an image to express your artistic endeavors or making several targeted adjustments to make an image pop out, color replacement techniques are an important skill to possess.
How useful Photoshop color replacement is, is prevalent by the existence of photo color correction service providers. There are experts whose dedicated task is to replace the colors of various objects in different images to suit their customer’s needs.
Another place this skill is used is for eCommerce photo editing. For example, you have many different color variants of the same product. However, photographing each color variant can be very expensive. You can use replacement techniques to change the color of the product to your heart’s desire.
Now let’s get an in-depth, step-by-step guide for the techniques you can use to master this skill. We have put forward three techniques here that will help you with any color replacement requirements that you might have in your project work.
Technique #1: Use the Hue/Saturation Adjustment Method
The Hue/Saturation Adjustment Method is the technique that allows you to replace the color of an object non-destructively. That is, you do not make any changes to the colors in the original image. It creates a Layer Mask where all the color changes are made.
Moreover, you can use this technique if you need to change the color at a later time instead of having to start all over again. However, this method does not work when changing black or white colors in an image, as it works with hues. It is so because hues are pure pigment which does not account for black and white colors. So, let us go through the steps of using the Hue/Saturation Adjustment Method here:
- Check out How To Remove a Background in Photoshop Quickly & Easily
Step 1: Create the Hue/Saturation Adjustment Layer
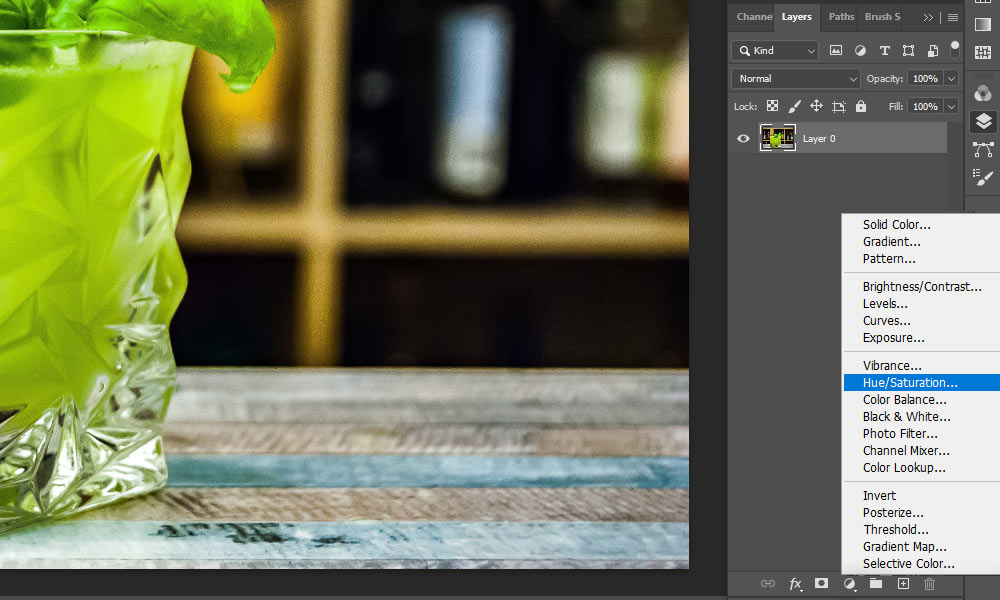
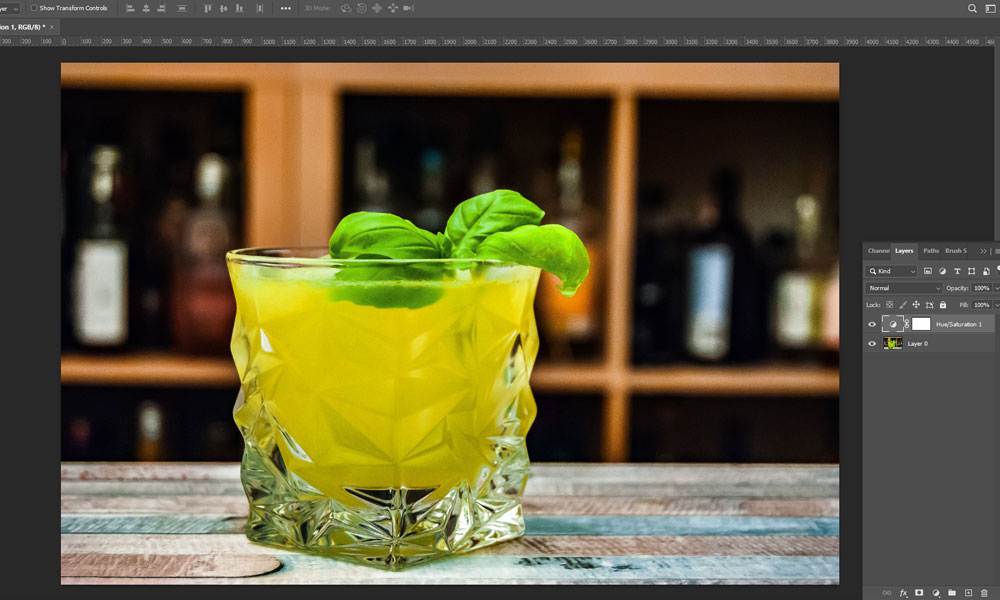
The first step is to create the Hue/Saturation Adjustment Layer. It is the layer in which you will make the color adjustments to replace the color of an object. To add this Layer to your workflow, go to the bottom of the Layer Panel. There you will find a button called “Create new fill or adjustment layer.” Click on it and select “Hue/Saturation” from the menu.
Step 2: Replace the Color of the Object
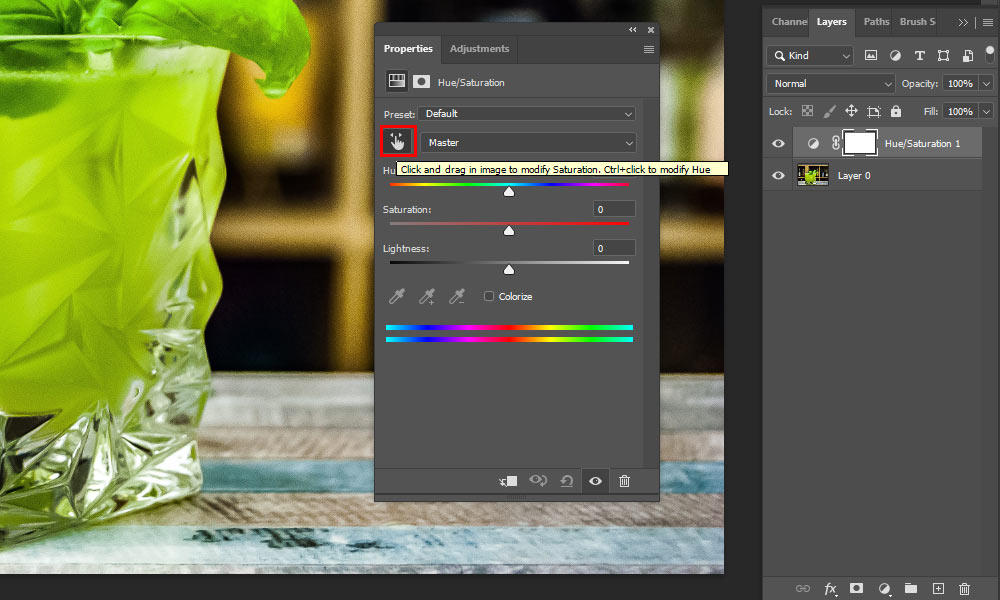
Now that you have created the Hue/Saturation Adjustment Layer, a toolbox will open, showing you sliders for Hue, Saturation, and Lightness. There is a button next to the Master. An eyedropper tool will appear upon clicking it. Then you must go to the area with the color you want to replace and click on it.
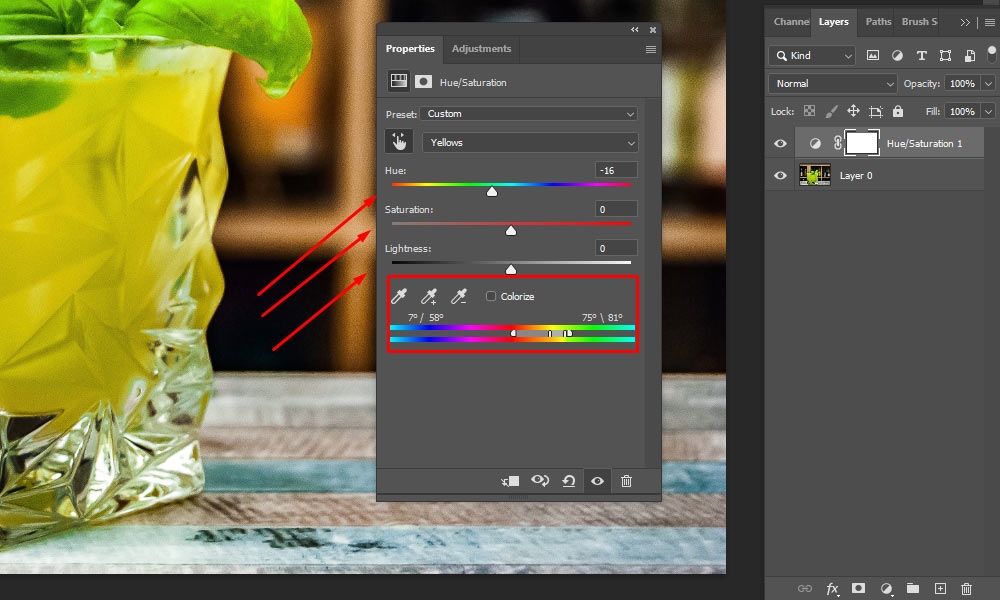
Moreover, if you click and drag on the image, it will change the saturation levels of the color you picked to replace. Saturation is the property that controls the intensity of the colors. Furthermore, you can hold down the “Ctrl” key on your keyboard for Windows or the “Cmd” key for macOS while clicking and dragging on the image to adjust the hue of the image. Thus, leading to replacing the color in the image.
- View more How Easily You Can Make A Background Transparent in Photoshop
However, you can manually adjust the color using the Hue, Saturation, and Lightness sliders to get the desired color for your object. The Lightness slider affects how dark or light the color is.
- Learn more about How to Photoshop Someone out of a Picture | The Easy Method
Step 3: Remove Undesired Color Changes
Now, this method affects areas with similar hues in other parts of the image. These color changes can be undesirable to you as you want to change the color of a specific subject in your image. Thus, knowing how to remove these undesirable color changes is necessary.
- Find out more about Impressive 30 Christmas Photo Ideas For You To Use
You can go two ways to remove the undesirable changes. If the color changes affect the majority of the other parts of the image, in that case, you can use the many selection tools available in Photoshop to select the object. To better understand the different selection tools, read our blog, “How to Cut Out an Image in Photoshop”
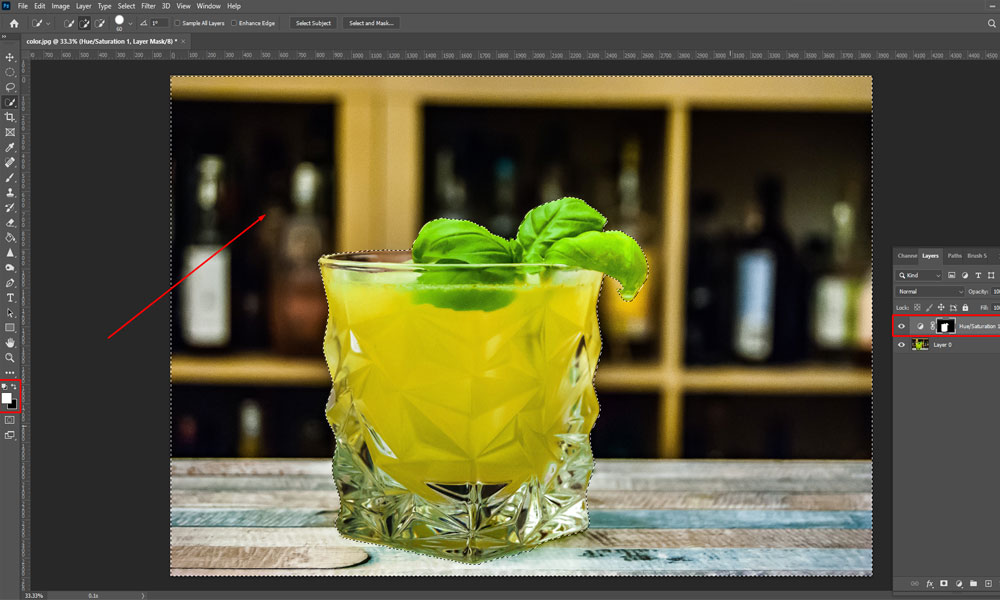
After selecting the object, you can inverse the selection by pressing (Ctrl+Shift+I) for Windows and (Cmd+Shift+I) for macOS to remove everything else in the background. When you take this step, you will see that the color changes you have made to your object stay while the remaining part of the image returns to the original colors. You must ensure to select the object while you are in the Hue/Saturation Adjustment Layer.
Another way you can remove the undesirable color changes is by using the brush tool with black in the foreground and brushing over the areas you want to revert to the original colors. However, you must make these changes on the Hue/Saturation Adjustment Layer.
- Check out How to Remove Watermark from Photo: A beginner’s friendly Guideline
Technique #2: Use the Replace Color Method
The Replace Color Mothed, like the Hue/Saturation Adjustment Method, replaces the color of an object by adjusting the hues in the image. Like the first method, this method is unsuitable if you want to replace black and white colors in an image.
So, how can you differentiate between the two methods? The Hue/Saturation method is a non-destructive way to change the color, as it creates a mask when you start the process. However, with the Replace Color Method, no mask is created on its application. It replaces the color of the object directly.
Another difference is that the Replace Color Method affects the color you pick globally; however, the Hue/Saturation method is easier to use for changing the color of specific objects. So, let us go through the steps of using the Replace Color Method here:
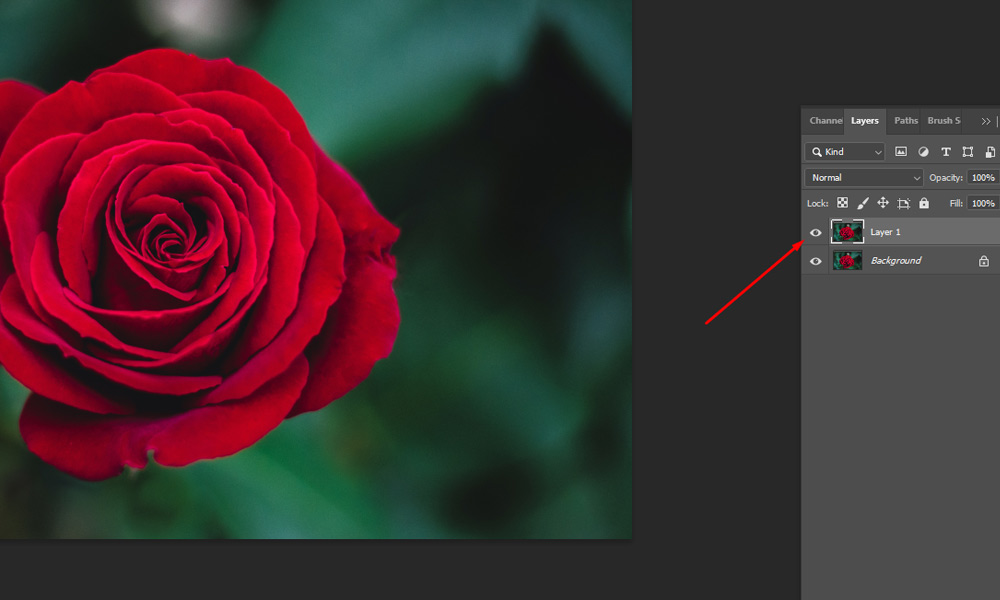
Step 1: Make a Copy of the Image Layer
This step is carried out so that you do not permanently change the color of your original image. It is always advisable to keep the original image intact. Moreover, it is also helpful during the last step of the color replacement process. That is when you want to remove unwanted color changes. Furthermore, having the original image layer, you can compare the color change with the original.
See: How To Edit Newborn Photos in Adobe Lightroom
Step 2: Open the Replace Color Tool
To use the Replace Color Method, go to the “Image” menu and select “Adjustments” from the drop-down menu. You will find the Replace Color Tool here.
Step 3: Select the Color for Replacing
A toolbox will open when you click on the “Replace Color” from the drop-down menu. One of the tools available in the toolbox is the eyedropper tool. You can use this tool to select the color that you want to replace.
Now, the Replace Color Method can adjust various shades of a color. When selecting the color for replacement, select the purest form of the color. A preview window is available for you to view the areas with the selected color. The white areas represent the color, and the black areas show the absence of the selected color.
Guide to Advanced Action Camera Flashlight For Taking Awesome Image
Usually, the intention for changing the color is for a specific object in an image. Thus, to make it easier for us to change similar colors in the neighboring area you have selected, you must check the box for “Localized Color Clusters.”
Step 4: Adjust the Selected Color
Now, the toolbox has two eyedropper tools, one with a plus sign and the other with a minus sign. Together with the Fuzziness slider, you can use them to adjust the selected color.
Every time you use the eyedropper tool with no icon, it is to make a new color selection. So, that tool is not going to be used for making adjustments. To adjust your color selection, you can add to it or subtract from it. The eyedropper tool with the add icon is for addition, and the one with the minus icon is for subtraction.
We have already discussed that we can select the different shades of the selected color. You can use the Fuzziness slider to do this. It controls the range of the chosen color that you can replace with another color. Increasing the slider will increase the range of selection while decreasing it will restrict the color range.
Guide to Action Camera Microphone Attachment (A Complete Buying Guide)
Step 5: Replace the Selected Color
The final step for this Photoshop Color Replacement technique is to use the Hue slider to pick the specific color you want to change your object. As for the Hue/Saturation Method, the application of Saturation and Lightness is the same.
Moreover, you can pick a specific color you want to replace with by clicking on the color swatch near the bottom of the toolbox. It opens the color picker, and you can choose the replacement color from here.
Guide to What Do Camera Gear Reviews Tell Us? [Everything You Must Know]
Step 6: Remove Undesired Color Changes
Same as with the first method, there could be areas where the color change is unnecessary. You can remove these undesirable color changes by selecting the object using Photoshop selection tools.
We have already mentioned our blog to familiarize yourself with the various selection tools. Since you will be selecting objects, it is equally important to understand how to deselect if you have made an inaccurate selection. To better understand deselecting in Photoshop, read our blog, “How to Deselect in Photoshop – The Ultimate Guide.”
Once you have accurately selected the object whose color you replaced, you can create a layer mask. The selected area will appear white, while the rest will be black. Creating the layer mask will eliminate any unwanted color changes.
Technique #3: Use the Color Replacement Tool
This tool is helpful if you are looking to carry out quick edits. You can paint over the area with the color you want to replace with your desired color. This tool works in the same way as you would use the Brush Tool.
You can choose from several blending modes depending on the object you are trying to change the color. It helps to give the object a natural-looking color change. So, let us go through the steps of using the Photoshop Color Replacement Tool here:
Step 1: Make a Copy of the Image Layer
Now like the second method we used for this blog, this method also permanently changes your image. Thus, working on a copy of the original image is always a good practice.
See: A Complete Convoy Of 3 Point Slinger For Camera To Choose
Step 2: Select the Color Replacement Tool
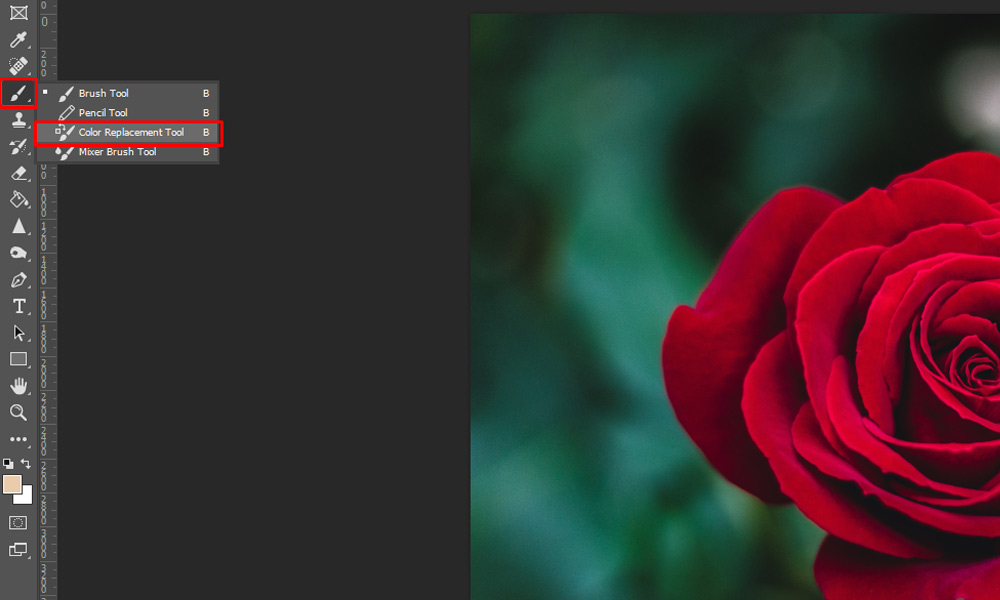
You can find the Color Replacement Tool in the toolbar on the left side of your Photoshop workspace. The Color Replacement Tool is hidden under the Brush Tool. Click and hold on to the Brush Tool, and the menu will appear. However, if the tool is unavailable under the Brush Tool, you can find it from the Edit Toolbar icon.
Guide to Best Trendy Travel Case for Camera
Step 3: Choose the Setting for the Color Replacement Tool
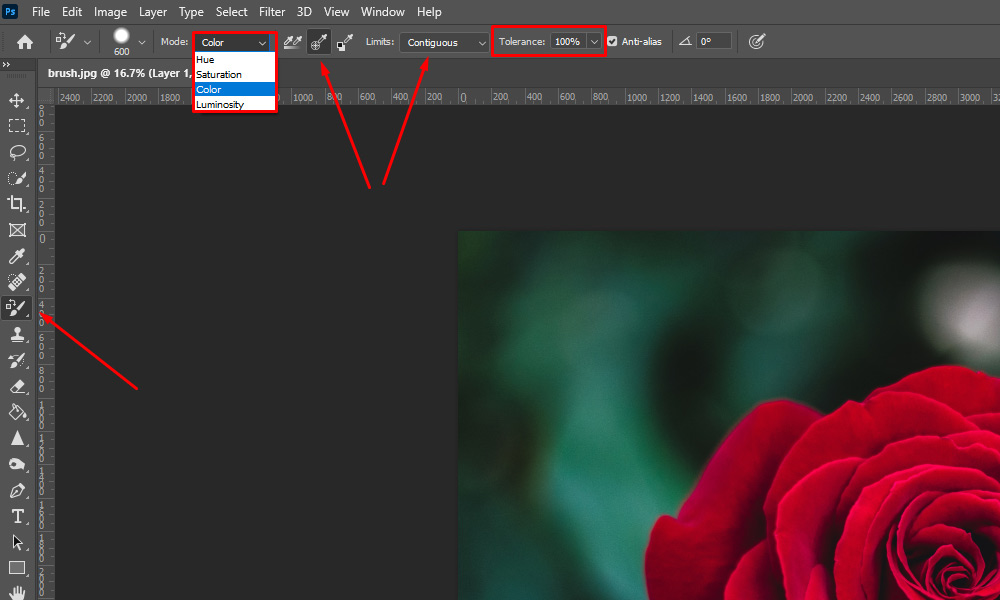
Once you have set the color, you must also decide on the blending method you want to use for your object. The default mode is set to “Color.” It works by changing both the hue and saturation during the color-changing process. In most cases, the Color mode will do an adequate job.
Furthermore, you must decide on the sampling you want to use for changing the color. If you want to replace various shades of the color, then you can use Continuous sampling. If you want to replace a single solid color, then sampling will do the job.
Another thing you must consider before using the Color Replacement Tool is the Limits setting. By default, it is set to “Contiguous.” With this setting, you can only change the color of the pixels right next o. It is useful in most cases where you want to change the color of a specific object.
Finally, you must consider the Tolerance setting. With a low tolerance, the Tool will replace similar colors, which you usually look for during the color replacement process.
Check out the list of the Action Camera Body Mounts
Step 4: Replace the Color of the Object
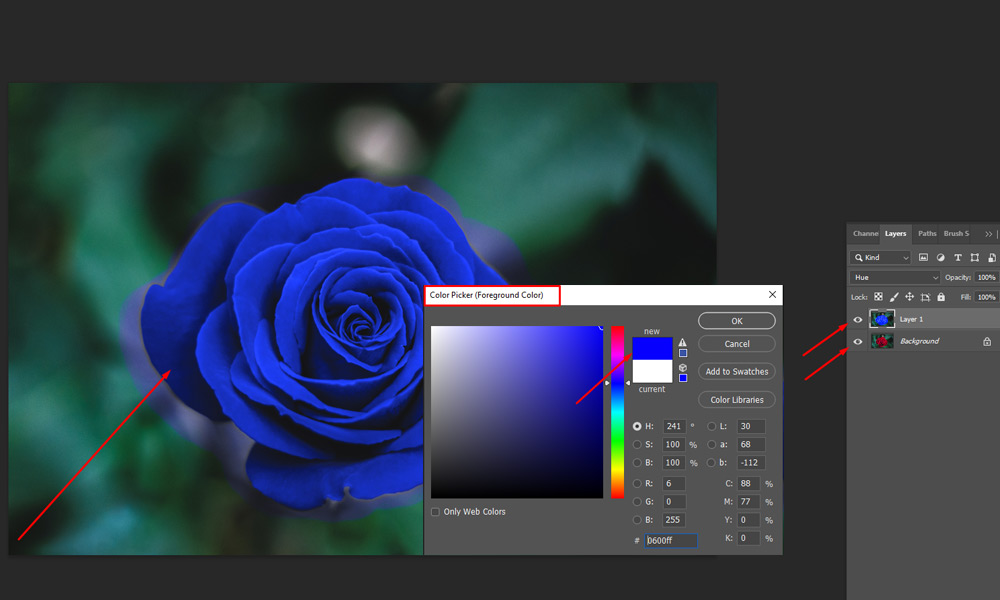
Now, to replace the color of an object using the Photoshop Color Replacement Tool, you must first set the foreground color to your desired color. Then you can brush over the area with the color you want to replace.
Receive professional Car photo editing service for about $1.50 per photo.
Step 5: Fine Tune the Final Output
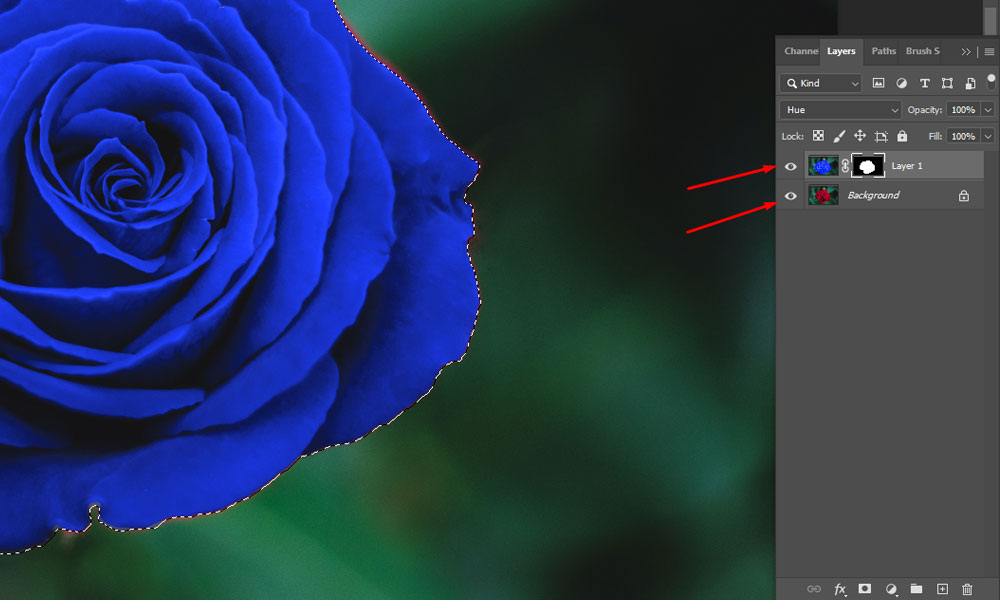
The last step of this color replacement process is fine-tuning your final output. Many times, the brush can color over unwanted areas. You can use selection tools and layer masking to remove those unwanted brush strokes in other areas.
Moreover, you can even use the eraser tool for fine-tuning your final output if you don’t want to go through the process of selecting. Furthermore, you can even use the Layer blending option to make the color appear more natural. In our case, we use Hue for our blending purpose.
- Check out Graphic Design is My Passion | Origin and Best 15 Memes
Watch our Video Tutorial given below!
Final Words on How to Master Photo Color Replacement
After going through the three techniques in this blog, you must be confident about using Photoshop Color Replacement methods for your design work. These techniques vary in flexibility and complexity. Whether you want to use them to provide your photo color correction service or start providing an E-commerce photo editing service, these techniques will always be handy.
So, what are you waiting for? Use this newly learned skill with other Photoshop techniques like Image Manipulation to make beautiful works of art!
Read Our Latest Articles-
- How To Edit Waterfall Photos?
- Image Masking: What, How, And Why?
- How To Take Pictures Of Shoes
- How To Do Color Correction In Photoshop? [Best 2 Proven Methods]

